DDG search drop in powered by ddg.patdryburgh.com
tl;dr I set up CI on my haskell project, it’s pretty easy if you keep calm and use Gitlab’s CI settings. I hit a few bumps in the road along the way, but you can skip to the end for the completed .gitlab-ci.yml
While I don’t think many people need an explanation as to why CI is a good idea, here’s why I’m going for it. As far as I see it, good software engineering as it relates to operations is like a ladder, and here is a non-exhaustive list of rungs, with sophistication/goodness of engineering increasing as I go along:
entr or grunt/gulp/webpack, you could even use watch)git hook testing - now theoretically no one who sets up the development environment properly can push broken code (unless they try real hard)Green flag: Companies that are good at engineering generally have all these things done/in place by the time you join, and will likely be iterating on how to make it better. How does it normally get better? Making it easier for humans to run the testing process/removing them from the situation entirely. Making it as easy as possible to run tests (and having them run automatically and tell you when something is wrong) is how you get people to run tests.
After wading into the Continuous Integration (CI) automation landscape and looking at your options and picking up knowledge, you start to open a new world for yourself. If tests are passing, and your tests are good, why not just deploy right then and there? Welp, now you’re at Continuous Delivery (CD). The terminology sounds fantastic, but it’s really the obvious result of stepping up your automation game. I’ve written a little bit in the past about the ops ladder, or what I call “operational intelligence” but as in the scope of CD the ladder looks like this in my mind:
kubectl apply -f <idempotent state of the world>.yaml)This ladder is much shorter, but at the end, you have something pretty special. Assuming it doesn’t become too unwieldly and complicated (this is where small team sizes, autonomy, and picking the right tools come in), it can be a joy to merge to master after a code review and have changes just go live (once they’re known to not break critical flows). It’s not that bugs won’t appear, because they always appear, but it’s that working code gets shipped out faster. Tech companies that are actually good at what they do are already doing this, and they’ve been doing this for a while. This is the only way to move fast and not break things (most of the time).
CI + CD is the dream (at least for now), so let’s get halfway there.
Despite all I wrote about the many advantages and doing it right(tm) feeling of mostly/completely automated CI/CD, I’m not using this tech on my most recent project, a job board written with a Haskell+SQLite backend (Haskell because it’s awesome, and SQLite because why not? I probably won’t need Postgres-level perf or featureset for a while).
Obviously, this is pretty sad, and a thing I should get around to correcting, especially now that the project is so close to launch, and I already have quite a bit of the code in place (I’m already on the 1.5.0 release! Even though those numbers don’t really mean much). I’ve finally found some time (honestly not very much time, but it works out since Gitlab is amazing) to make it right. Time to practice what I preach at least a little bit and set up some automated remote CI – at present I only have git pre-push hooks set up.
If you haven’t learned you a great haskell, or really got a feel for haskell in the real world, you should. It’s the language you wish Java was. Also maybe consider buying the books – I bought LYAH and it was somehow even more fun to read in paperback form.
As far as I know, Gitlab is one of the first F/OSS open source git hosting/code management tools to start moving towards baking in CI/CD into it’s core product. A while back they made an announcement about Auto Deploy, and showed how they were executing on their vision to empower developers, and I was blown away. Amost a full year later, the dream is pretty real Auto DevOps is a thing, and it’s going to change the way small software shops write code.
While I’m not going full Auto DevOps for this post (hopefully I get to one day), I’m focusing on getting just Gitlab CI set up, so the first step is to read/skim through the documentation and get a feel for what I’m going into.
Since honestly it wouldn’t be too hard to whip up the configuration or find a template you could use online, let’s take an interative approach to building the .gitlab-ci.yml that’s juuuust right for this Haskell project.
Seems simple enough – the way Gitlab CI works is that you put a file called .gitlab-ci.yml in your repository, and the Gitlab instance (whether yours or hosted through gitlab.com) reads it and does stuff.
To start off, I made a ticket for adding CI, and started by getting on that branch and adding the most basic .gitlab-ci.yml:
image: fpco/stack-build:lts-8.15

stages:
  - build

build:
  stage: build
  script:
    - make build
If you read the blog regularly you might have noticed that I went with the fpco/stack-build:lts-8.15 container here – hopefully it’s going to save us some time as I won’t have to do the usual build-shenanigans I do locally in preparing an Alpine Linux based container.
Also if you’re not down with Make, check it out – it can get hairy when you start using the deeper features on a large team (I’ve heard from more experienced developers that “Make hell” is a thing), but it’s refreshingly widely available on many platforms and almost always everywhere, so I love to use it across projects (a Makefile fits well enough in a NodeJS project as well as a Golang project).
If it’s not obvious, here I’ve got a configuration that will:
fpco/stack-build:lts-8.15 container, which should have a lot of deps already installedbuildmake build when that stage runsYou can always check out if your configuration is valid using Gitlab’s CI Linter.
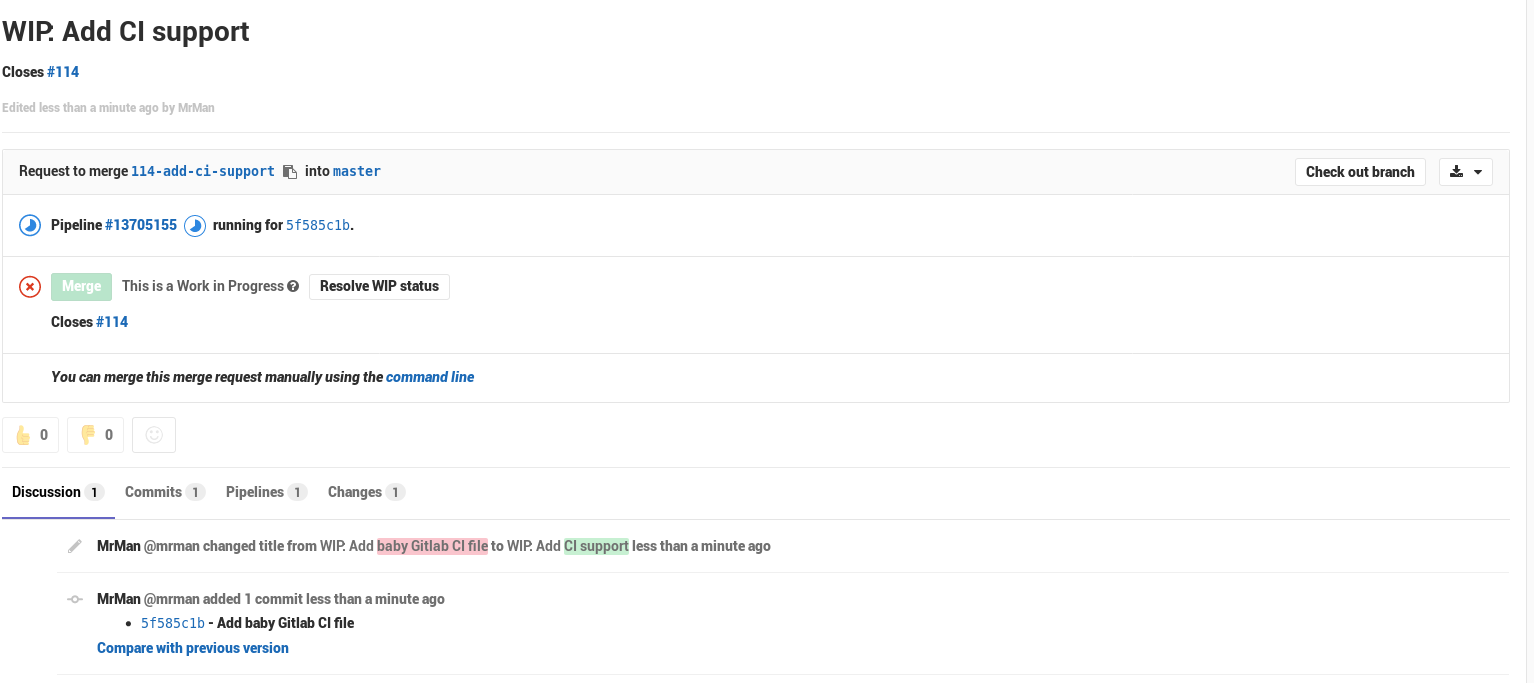
It took a few seconds for Gitlab to wake up and start running the pipeline/get the branch all ready, but with this configuration (in the first try, I might add), I’ve got a nice running pipeline.
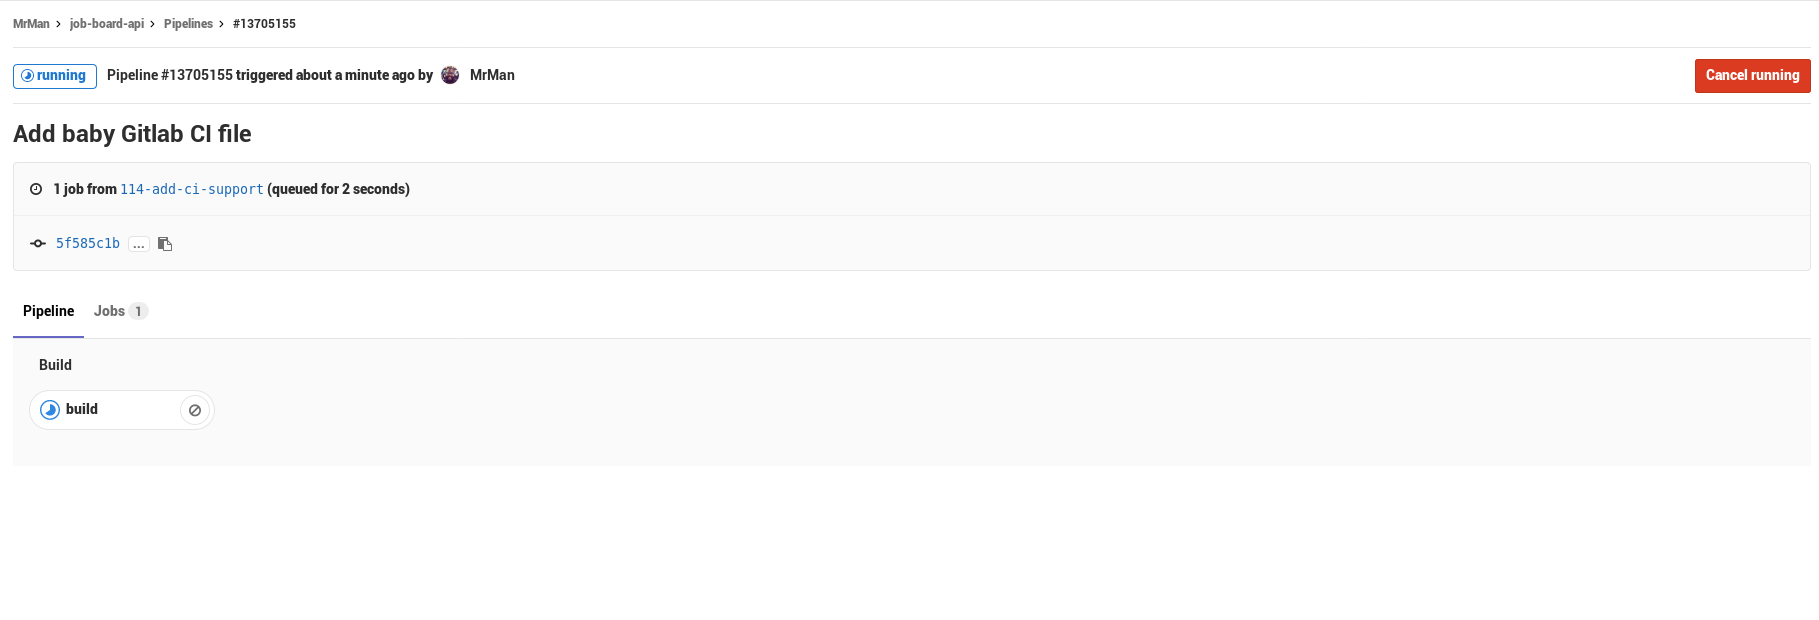
And if you click through to the pipeline’s page
The first build happened to fail, but the reason was not Gitlab’s fault – turns out stack install --local-bin-path <path> will NOT auto-vivicate (hey Perlers out there) the folder, so my build failed because the target folder wasn’t present…
Adding a quick mkdir target; (to the Makefile) and I was able to sidestep the problem pretty quickly. I also added an option to the Makefile to support passing stack options so I can use --system-ghc easily to avoid downloading any more GHCs than needed.
#... rest of config ...
variables:
  STACK_OPTS: "--system-ghc"
#... rest of config ...
script:
  - make setup
  - make build
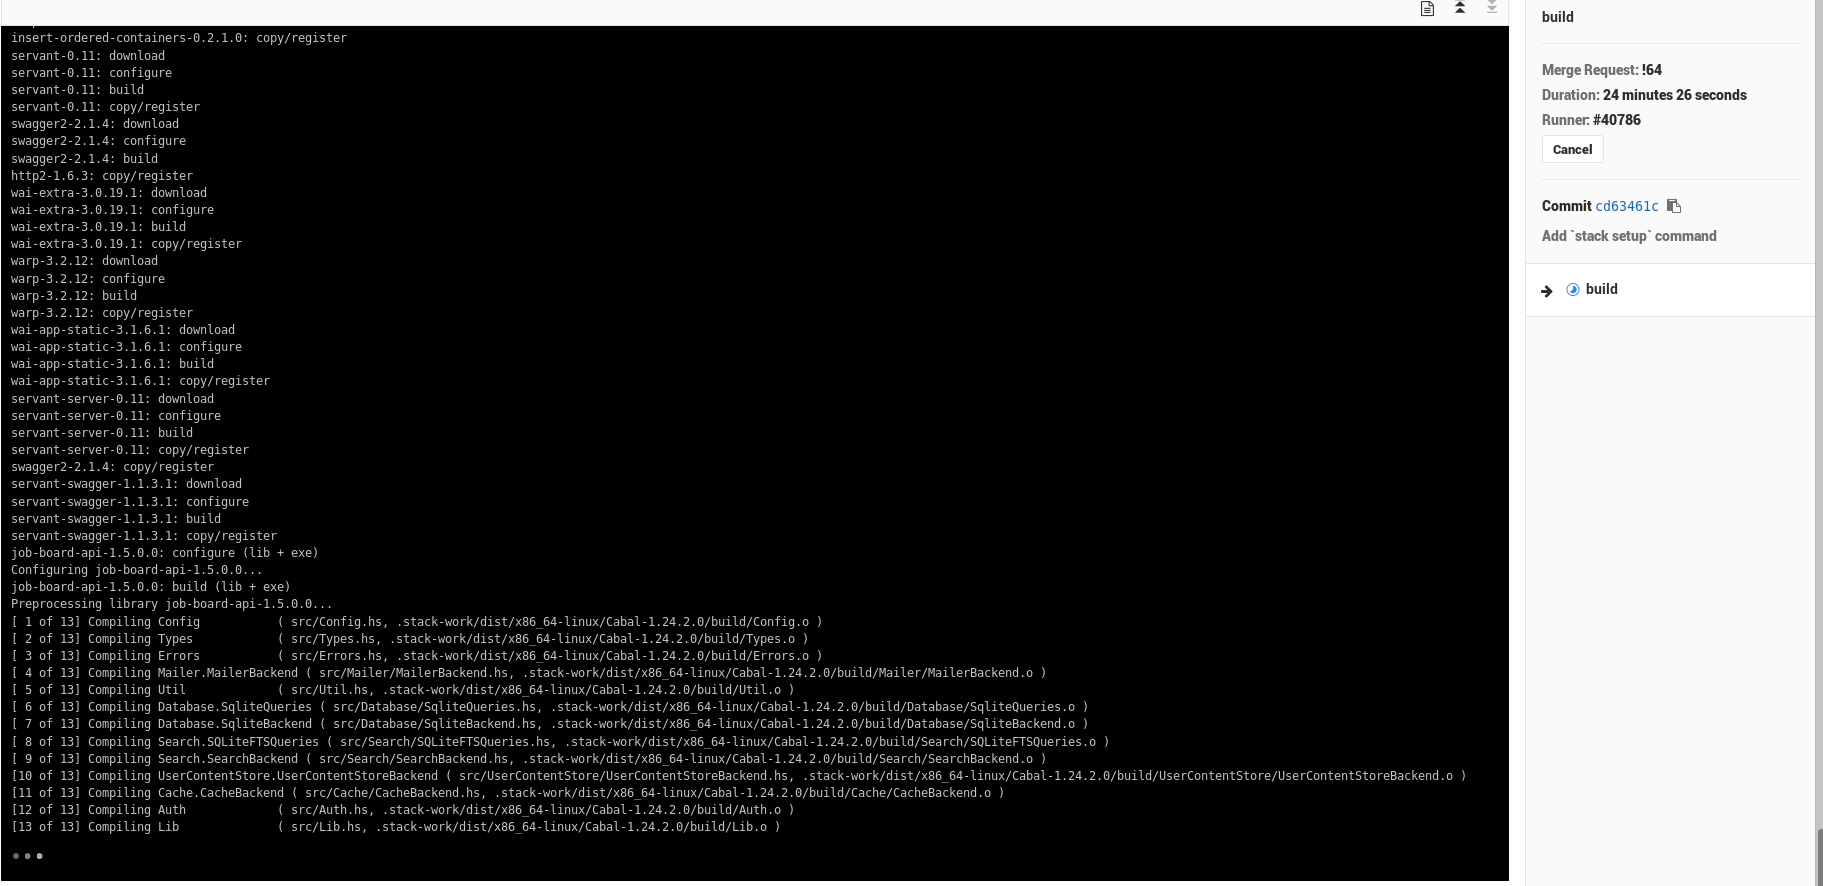
Not that’s it’s running, here’s some terrible news – It’s DOG SHIT SLOW. The build took over 20 minutes, mostly spending time downloading and buildling dependencies of my project, even starting form fpco/stack-build:lts-8.15 (I thought that would save me some time but maybe it didn’t… or it did shudder). Look at this insanity (top right):
Eventually the build finished and my code actually got built:
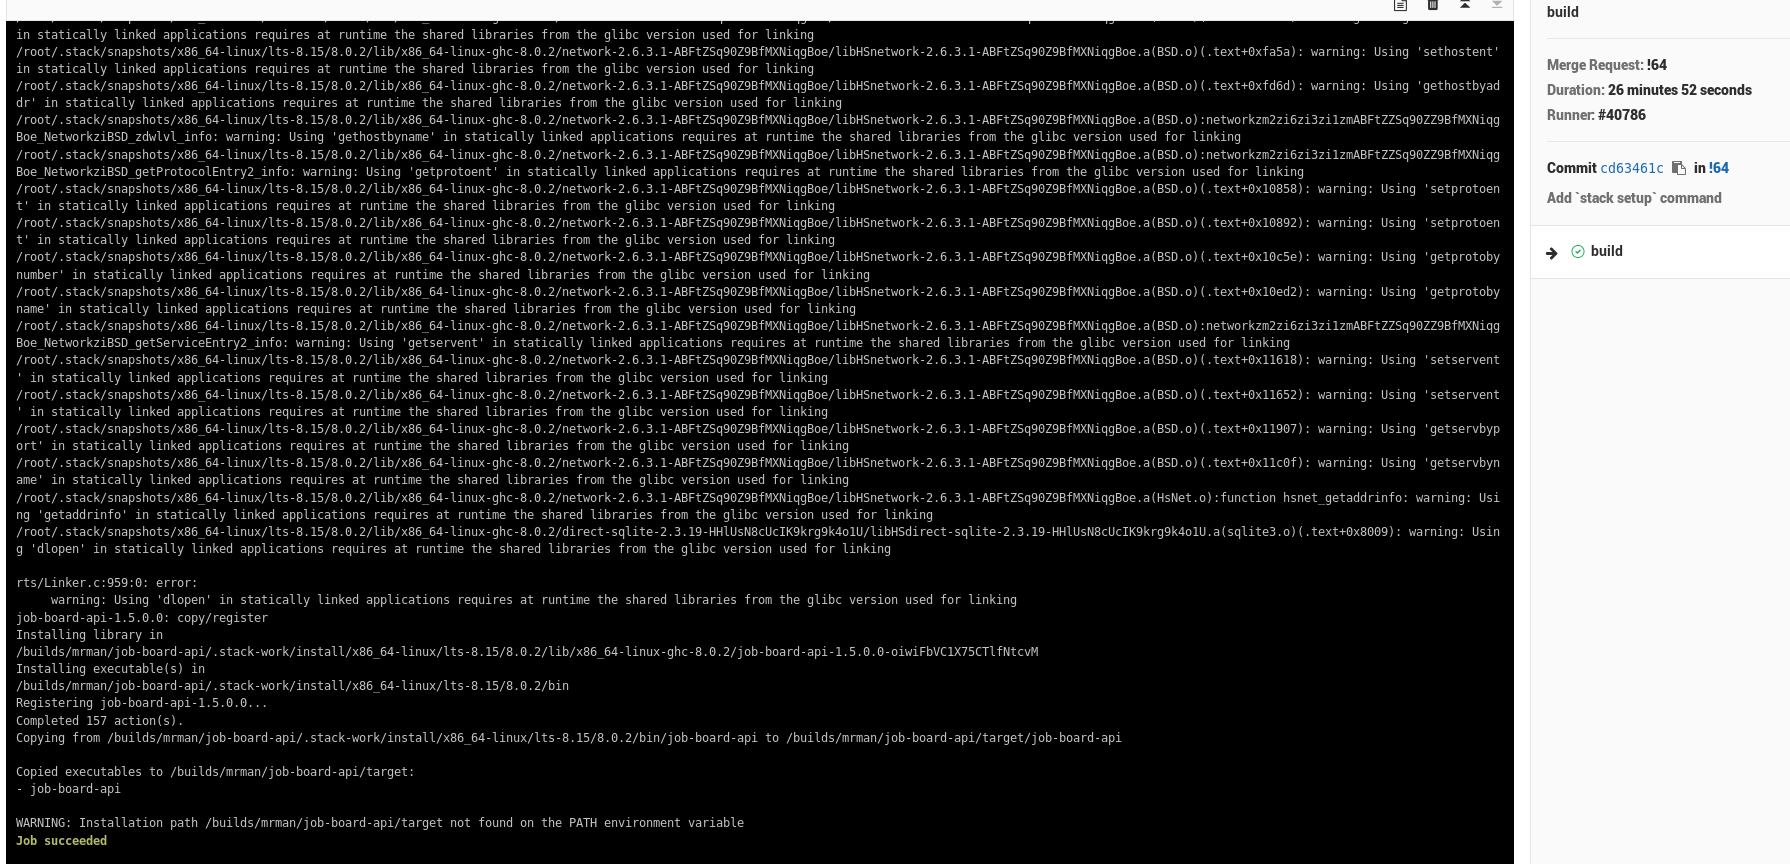
You see those warnings about functions from glibcfrom the static build I’m doing? I’ve run into those issue before, and I half-expect that they will bite me in the ass when I start actually adding the tests I need to run – though as long as I stay in the fpco/stack-build:lts-8.15 container I should be fine but if I dare to deviate I will be met with swift retribution in the form of code that is subtly linked wrong.
I was going to save this for later, but this build time is insane, gotta do something to make it better, let’s tackle that now. It’s time to…
So, the current setup works, but it’s horrendously slow. Let’s make it better with one crazy trick(tm):
It’s pretty easy to take advantage of caching provided by Gitlab to your configuration by adding these lines:
cache:
  paths:
    - .stack
    - .stack-work
    - target
Naively, I’m just caching all the directories I know/expect stack uses. This could be bad, but from where I’m sitting I can’t think of anything obviously wrong with it (other than the directory being ginormous). stack is a pretty smart (but maybe not fast) tool, so it generally does the right thing and installs/re-installs dependencies as necessary.
Turns out there’s an additional issue – due to Gitlab only caching stuff INSIDE your project, you need to make stack’s root inside:
STACK_ROOT: "${CI_PROJECT_DIR}/.stack"
If you’re following along at home, you might also expect that I’ll have to take one more 25 minute L (“loss” for those not familiar with recent slang). You’d be right – The build has to actually complete again before I can cache the results. Now that I have that out of the way though, the build time has gone down to 5 minutes!. Caching, here again to save the day.
As the build time is still a little long for my tastes (I’m spoiled)… I’m starting to consider moving from the fpco/stack-build:lts-8.15 to haskell:8 image, as the CI spends roughly 2 minutes just downloading the 1GB (!!) fpco/stack-build container, and haskell:8 is 250MB. I did find that haskell:8 does require the installation of make and xz which are a apt-get away (the underlying OS for the image is debian), so that will contribute some time as well.
As I was messing with fpco/stack-build vs the haskell container, I realized that cached build stuff can actually became a liability if you switch distros/images. Since stack is doing full builds of this library (akin to if you were to ./configure and make libraries yourself), switching from distro to distro of linux can be very jarring (the same reason you can’t just go something built for a ubuntu container to someting built for an alpine linux container quite as easily, for anything other than a truly static fat binary.
Since most (certain?) distros use glibc it’s hard/impossible to get fully statically linked binaries built in haskell properly (note the warnings). Due to this issue (or at least my understanding of it), I had to do a run where I used stack clean --full to try and get rid of the intermediate cached built stuff, because stack still thought it was properly built, but the build results for all the little dependencies were incompatible.
If you find yourself with a non-sensical build error when you know your project should be building just fine, this fragment should help:
build:
  stage: build
  script:
    # Clear out cache files
    - rm -rf .stack
    - rm -rf .stack-work
    - stack setup --system-ghc
    - stack install --local-bin-path target --system-ghc
After running once, you can remove the stack clean line and go back to regular life. Very recently the gitlab ticket for UI-based cache clearing has been getting some attention so maybe there will be an easy to use button soon.
After this cache-clearing build (which took 27 minutes – just about the same time as fpco/stack-build, even with the apt-get commands… why do I use fpco/stack-build again? Surely I must be using it wrong, missing out on some utility), build time for a cache-friendly build is down to 3 minutes!. That’s more like it! This is a little misleading, since there was literally NO building done (100% just a cache hit on the part of stack), but this is great, because commits that don’t change any code (but might change other things) can get through pretty quick.
Time to finally do what we came here to do…
Now that we’ve got the build working, let’s go ahead and actually run some tests!
image: haskell:8

variables:
  STACK_ROOT: "${CI_PROJECT_DIR}/.stack"
  STACK_OPTS: "--system-ghc" # My Makefile uses this to pass options to stack

cache:
  paths:
    - .stack
    - .stack-work
    - target

before_script:
  - apt-get update
  - apt-get install make xz-utils

stages:
  - build
  - test

build:
  stage: build
  script:
    - make setup
    - make build

unit-test:
  stage: test
  script:
    - make test-unit

int-test:
  stage: test
  script:
    - make test-int

e2e-test:
  stage: test
  script:
    - make test-e2e
The obvious addition here is the three tests, running during the test stage. Of course, as you might expect, the tests run in parallel in the same stage, so it’s pretty great!

It is pretty much impossible to keep up with all the the software/systems I find interesting, but as technologies I like die, or lose their corporate entities, some stay strong and get even bigger – Gitlab is definitely one of them. Thanks a lot of hard work from volunteers and the Gitlab team over the years, it was very easy for me to set up this CI pipeline and get some automated testing going easily to accelerate my development.
Up next is doing more of the Auto DevOps playbook – bringing even more of the power of my Kubernetes cluster to bear. I’m excited for what’s next.