DDG search drop in powered by ddg.patdryburgh.com
This post was started actually way back in 2018, but I just lost interest writing it. I thought it was a shame to waste the procedural style and explanations in here, so I'm releasing it in it's incomplete-ness. Here in 2020 I think it's safe to say that I probably won't regain interest in this topic, especialy with Vue 3 reaching the mainstream.
This guide was meant to explain how to get started with Vue 2, but starting from the perspective of how you would write functionality without a framework at all (web 1.0 style).
tl/dr; “Onion guides” are my name for well written from almost-zero-knowledge guides, In this post I attempt to do one for a large chunk of modern web frameworks, with the case study being a Vue app with most of the bells and whistles. I’m actually fairly sure that this guide is at the same time both too basic and too advanced (who tries to start on Vue without having HTML/CSS down pat?), but I’m just going to let it fly, hopefully you won’t have to pick through too much of the rough to find a diamond. I’ve separated the post into two parts so you can at least jump to the Vue part if you don’t need a refresher on basic HTML/CSS/JS
This post is in two parts TODO LIST PARTS TODO
I’m taking a break from my regularly scheduled programming (I’m in the middle of a series on trying out monitoring/observability tools/frameworks) to do a review of modern web development and explore a new format for technical posts that I want to introduce which I’m calling “Onion Guides”. What I’m calling an “Onion Guide” is really any guide that focuses on the building of solution from first principles, and aggressively detailing and investigating the why (problem) as well as the how (solution) for a technology/approach – layering the complexity on as we go. For example, explaining the modern network stack is hard, but the OSI networking/communications model is basically an Onion Guide for it – it starts from least complexity, and layers on the features needed, and if you were to go through that hierarchy step by step, by the time you got to layer 7 (the top layer, where web browsers reside), you’d understand why the stack does what it does, and is structures as such.
Unless you’ve been living under a web development rock – which is totally fine, sometimes we all need respite from the madness – you’ve probaby heard of Vue. I’ve been using it for a while, and let me tell you, the hype is almost completely deserved (and most of it was not generated by a marketing budget). Vue is the simple, fast, coherent framework that you wanted React to be – while react has basically rewritten itself to try and shed some of the complexity that came with it, Vue started light, and has stayed light. If you can’t tell, I’m a biased against React, because I think it’s packed with non-essential complexity (whether directly or indirectly), and that’s a terrible thing to accept in a frontend codebase. There are a lot of reasons for my opinion, but in the end I’m just a stranger on the internet, so take it or leave it – I’ve [written about why I think you should stop using react before][stop-using-react] as well so you could check there. Either way let’s get back to the subject.
Why does Vue deserve the hype-train?
<script> tag away – this means no struggling with webpack/whatever/downloading a template unless you want to)<my-component>)vue-router is a separate module, build tooling via [vue-cli] is an option, and they explicitly discourage beginners from using it)The biggest pain-point I’ve ever had with Vue was it’s unclear/sometimes-surprising reactivity model. What I long for was the tradeoff that KnockoutJS makes – at the cost of making a ko.Observable() thing, you no longer have to worry about where you make changes from, what makes changes – everything that needs to be updated is updated. I’ve had times where something I expected to work based on how the reactivity documentation was phrased and it didn’t, which was pretty frustrating.
Anyway, maybe you’re convinced now of how awesome Vue is, maybe you’re not – let’s go on to how to get started with it, starting from almost-zero. I say “almost-zero” because I do assume you, the reader, know what a computer is, vaguely how the internet works, and a knowledge of HTML at the very least including the <script> tag. The example application I’ll be using to build this Onion Guide is simple game that’s been running through my mind for a while I like to call “Do you even Reddit?”. The concept is simple:
This app should be interesting enough to keep my (and your) attention, as well as complex enough to be a good flex of Vue’s muscle. Let’s dive in.
So there are a few things that I’m assuming you already have at least a vague familiarity with: HTTP, HTML, Web Browsers, The Internet, Javascript. I sure hope you’re familiar with them, since we’re going to start with some HTML, CSS, and JS right away (note I created a folder called dyer short for “do you even reddit” to store files in):
dyer/index.html:
<!DOCTYPE html>
<html lang="en">
<head>
    <title>Have you even Reddit?</title>
    <meta charset="utf8"></meta>
    <meta name="viewport" content="width=device-width, initial-scale=1, maximum-scale=1"></meta>
    <link rel="stylesheet" href="./styles.css"></link>
</head>
<body>
<h1 class="centered-text">Do you even Reddit?</h1>
</body>
</html>
Most tags are pretty self-explanatory, though the viewport meta tag might need some more explaining – it’s basically how we can get responsive design for free, we say that the page width is the device width, and devices shouldn’t try to scale the display – this means we’ll be doing the work to make sure thing display in a way that fits on big screens and small screens ourselves.
dyer/styles.css
html, body {
  height: 100%;
  margin: 0;
  font-family: Courier new, Courier, Lucida Sans Typewriter, Lucida Typewriter, monospace;
}

h1,h2,h3,h4,h5 { margin: 0; }

.centered-text { text-align: center; }
These styles are pretty boiler plate, here’s a quick break down:
<html> tag takes all the space it’s able to, and the <body> tag does the same – this helps when creating full page layouts.margin from the most commonly used header tags – This may seem silly, but I like using H1s and H2s for visual hierarchy, but they can introduce odd spacing bugs. For example, if you put a <h1> in side a <div> at the top of your page, while you might expect the <div> to sit flush (since it has no margin by default, it won’t – the fault of the <h1> it contains.If everything’s gone right, you should be able to:
dyer folder (wherever it is on your hard drive)For me, it looks like:
Congratulations! You’ve just be come a moderator of r/Web_Development!
Jokes aside – this is how simple “web development” CAN be, and I try my best to not stray too far from it. In the end, you’re writing some HTML, CSS, and optionally JS, and getting it to show up on someone’s computer by sending them that file, just over the internet instead of locally on their hard disk. It’s important to remember, in this age of apps and advanced JS, the basics of what the platform affords you.
That said, now let’s get started making everything more complicated :)
Thinking back to what we are setting out to achieve (the “have you even reddit” game), there’s an obvious difference between what we can achieve now (with the site we just made), and what we want to achieve – we want to be able to pull reddit front page content/stories in real time, and change the page so that it displays them. At the very least, we want to have a page that shows a button, click on that button, and have something happen. We’ve reached our first big problem:
Problem: We need to be able to dynamically update the page
Adding interactivity is where [Javascript][javascript] comes in – it’s a scripting language that runs in your browser, and powers dynamic interaction with pages. Browsers can choose to run it, or not run it, and if wielded properly, it turns a simple webpage (like the one we’ve just created), into an “application” (some people detest the terminology, I think it is apt). Normally, complex web pages are made of multiple individual HTML pages, linked to their own CSS/JS – what we’ll be making is called a Single Page Web App (SPA), with the help of a library called Vue. Before we get to that, let’s make some progress – let’s get the button we want to be there onto the page, and hook it up so it does something when we click it.
The HTML we’ll need to throw in is the [<button>][mdn-button] tag, and we’ll also pull in an external JS file with the functionality (whatever that is) in it. Pulling javascript from another file and getting it to run on your page follows a similar process to using CSS from another file – except this time instead of the <link> tag, it’s the <script> tag. Let’s add the button, not hooked up to any functionality yet, and also start adding the external code, making sure to print something so we know it’s loading (even though we’re not using it for anything yet):
dyer/index.html
<!DOCTYPE html>
<html lang="en">
<head>
    <title>Have you even Reddit?</title>
    <meta charset="utf8"></meta>
    <meta name="viewport" content="width=device-width, initial-scale=1, maximum-scale=1"></meta>
    <link rel="stylesheet" href="./styles.css"></link>
</head>
<body>
<h1 class="centered-text">Do you even Reddit?</h1>
<button>Click me</button>

<script type="text/javascript" src="./index.js"></script>
</body>
</html>
dyer/index.js
function doSomething() {
 // ... code will go here ...
}

// This line will execute as soon as the file is loaded
alert("Code loaded!");
A few things I should clear up:
Why is the <script> tag at the bottom, unlike the tag? - good catch! The <script> tag could have absolutely gone at the top! It turns out that there are some optimization reasons to put it at the bottom, and the jist is that your browser will stop processing the rest of the page once it encounters a <script> tag – this makes the time until your user can see something interesting on the screen unnecessarily long (if you have decent HTML that you want them to see as fast as possible, better to show it to them as quick as possible, evne if the scripts will take some time to load). This SO question has a pretty good answer.
Why’d you write the function but not put anything in it? - Because I can! I find (and maybe you will too) putting placeholders in my code reminds me of the end goal I’m going towards and helps organize my thought.
What is alert(..)? - Check out the alert(..) page on MDN!
But that resource says Window.alert, what’s Window? - One thing about running javascript on the browser (as in, in a webpage, as you are now), is that there are some Global variables provided to you for free – one of these is Window, another one is console (called whenever you use console.log(..). When you write something like alert(..) you’re actually calling Window.alert(..) (“the function called alert which is a property of the Window global variable”).
Hopefully you’re not too lost at this point! When you load up the page, you should see an alert pop up in your browser that says “Code Loaded!”. By now you probably already know (or found out very quickly) what the alert function does – it shows that alert. The important part about taking this small step is to see that when your code gets loaded, it doesn’t just get loaded – stuff can actually happen! In addition to your code being loaded, stuff that is written is executed.
What about that function? it got executed, but nothing happened right? Long story short, the function was created (with the name you gave it, doSomething), but since no one’s used it yet, it hasn’t had a chance to do anything. The alert(...) line is me “invoking” (executing, calling, loosely “starting”) the alert function (which as we read previously really lives on a magic given-to-you thing called Window but is available everywhere as alert.
OK, let’s take a breath, and bask on what we’ve created so far:

OK, now that you’ve gotten a crash course on external JS and making dynamic things happen, let’s hook that button up to the alert we are making happen. To make it so that the alert only shows up when someone clicks a button, move the alert(..) line INTO the function that’s above it:
Move the alert into the doSomething() function:
function doSomething() {
  // This line will NOT as soon as the file is loaded, only when this function is "invoked"/"called"/"started"
  alert("Doing something!");
}
If you reload at this point, the alert should stop showing up – but more importantly, if you click the button, nothing happens still! Don’t be dismayed, we have yet to actually hook up the button to do anything, so this is totally normal.
This is one of those times when you hit on something that’s crucial to all programming and dare I say engineering in general – you need to Read The Fucking Manual. This is a guide so I’ve been feeding the next steps as they come up, but at this point, a small voice inside of you should soon start wondering “I wonder how I can make <button> tags do stuff. What does ‘do stuff’ even mean? Since we just moved the alert into the function, maybe run a function?”. This kind of inquisitiveness and educated guessing about the next step is crucial, in my opinion, to being a good programmer/creator. Right after that though, you maybe would have thought to take a peruse through the [<button> documentation to find anything that might help][mdn-button]. You would have come upon….
Unfortunately, it’s not so easy to find from the <button> page itself, the onclick HTML attribute, one of the Global Attributes is exactly what we need/want! So in addition to the attributes listed on the <button> page, there are some global attributes that EVERY HTML element (<h1>, <div>, <button> all have onclick). Unfortunately it’s pretty difficult to piece together from the MDN documentation, but W3Schools (often derided as the worst of the worst) has us covered. Here’s what the modified HTML would look like for us:
<!-- ... rest of the html not printed here ... -->
<button onclick="doSomething()">Click me</button>
<!-- .. the rest of the html -->
So, by only setting a string "doSomething()" to the onclick attribute of the <button> HTML element here, we’ve actually made it so that when the button is clicked, the function doSomething is “invoked”/“called”/“started”. Try it out!
More technically stated, what we’ve just done is connect a function (defined in Javascript) to a HTML element (defined in HTML), by way of making the function “handle” the “click event” of the HTML Element. So when that element is clicked, the function we specified is called.
Note the cycle we just went through:
onclickGet used to this cycle, it’s going to happen a lot! Another important thing to get used to, is writing JS that affects HTML and vice versa. Our JS is actually “talking to” (so to speak) and interacting with our HTML, and they’re working TOGETHER to achieve the goal we set out. Even furhter than that, HTML itself can be modified by JS, which we’ll can be modified by JS – which we’ll be trying real soon.
Let’s get a little closer to our goal – this time when we click the button, let’s get some NEW content, that wasn’t on the page originally, to show up! If you remember our original goal, we’ll need to somehow pull some images from Reddit and show them to the user, so let’s start with just adding text to the page to get a feel for modifying a page at all.
At this point, we’ve got some experience hooking up a function to a HTML element, by way of specifying that function as what people call an “event handler”. Let’s change what that “event handler” (function) does now – let’s make it change what the page has on it. To Start off simple, let’s make it add some basic sentence to the page when we click the button. It turns out that you can reference (and modify) the current page itself from javascript by using the global document object that is made available to you. To be even more pedantic, it’s actually through Window that it’s being made available to you – Window.document is what you’re accessing when you type JS like document.someProperty. At this point, feel free to check around the internet (MDN, W3Schools, Google, wherever) for some guidance on how to add elements to the document – I’ll wait!
Now that you’re back, here’s how I would write that code (there’s many times more than one way to do it, this is just one of them):
function doSomething() {
  // This line will NOT as soon as the file is loaded, only when this function is "invoked"/"called"/"started"

  // Get the "<body>" element
  var elementsWithNameBody = window.document.getElementsByTagName("body");
  // Since `getElementsByName` (https://developer.mozilla.org/en-US/docs/Web/API/Document/getElementsByName) returns a LIST of things (as it's name suggests), we need to actually get the one <body> element out of it (we expect there to be only one, since we can see the HTML)
  var bodyElem = elementsWithNameBody[0];

  // Now that we have the body element, which is the in-code representation of the HTML we wrote -- let's add a new element to it (we already know it has a <h1>, <button>, and a <script> tag in it)

  // The elements inside are kept in a property called `children` (https://developer.mozilla.org/en-US/docs/Web/API/ParentNode/children) which acts like an array...
  // If we wanted to add to the children, maybe we could just `push` (https://developer.mozilla.org/en-US/docs/Web/JavaScript/Reference/Global_Objects/Array/push) one in??
  // bodyElem.children.push(); ???? is this right? how do you add an element into another element? -- hint: no, this isn't it

  // Let's make the element we want to push in, we know the HTML we want to show up is '<div>new element</div>'
  // we just need to create the HTML element for it, *from javascript* (where we are now)... The key to that is:
  // window.document.createElement (https://developer.mozilla.org/en-US/docs/Web/API/Document/createElement)
  var newElem = window.document.createElement("div");
  newElem.innerHTML = "new div!";  // Set the inside content of the <div> we created to what we want it to be

  // Now, let's do that push in the element, and alert once we run all this code!
  bodyElem.appendChild(newElem);
  alert("Added new div!");
}
Holy moly , there’s a lot happening now. We just went from zero to close to a hundred, as you can see with the comments, there’s a lot to break down so let’s go through it:
Inside doSomething(), the first thing we do is start trying to retrieve the <body> tag, from INSIDE JS (!!).
The fact that you can modify the HTML structure and contents of the page from inside javsacript may not be obvious, but rest assured, you can! This might be a good time to read up on (window.)document.getElementsByName.
SIDENOTE Check out document.querySelector if you want to learn about a fancier way to access elements on the page than document.getElement* functions.
To get the body tag, we retrieve a list of elements whose tag name is ‘body’
It’s important to note that this list of elements COULD be empty, for example if our page was making use of some of the changes from HTML5 which no longer require <body> tags. Since we’ve written the HTML and we know there’s only one <body> (for now?) we can reasonably expect that there will only be one. Assuming that’s true, let’s access that element and make it easier to refer to by creating a variable to keep track of it, bodyElem.
If you’re wondering what would happen if the <body> element is not there, all this code would still run, but bodyElem would actually be undefined, a special value in javascript.
Creating the new element we want to add to the page
We try to make a new elem (named newElem) to be added to the page. This is markedly different from how we created new elements in index.html – there, we just wrote the elements and they started existing, where we wrote them to be (when you load the page in a browser).
This is what is often called a declarative programming model – you said there was a
<h1>as the first child of the<body>tag? So it shall be. The code to do this from the JS is what is referred to as imperative programming – note how we create the element object withdocument.createElementthen we set it’sinnerHTMLproperty to something.
Push the new element into the <body>
Now that we’ve created our element, it actually still only exists in the JS layer – simply creating an element with document.createElement does not put it on the page. We still have to tell the browser where the element should go – in particular, which already-existing element it should go into, as a child!
Now that doSomething() is actually doing something, let’s rename it to reflect what it actually does – appendNewDivToBody() is a pretty decent descriptive name. It’s probably also a good idea to give the button a good name instead of “click me”
OK at this point, when you load the page, you should be able to click the button, and see a new <div> get appended from JS! Feel free to click the button lots of times and see the results of your hard work! Here’s what it looks like for me:

“Data structures” is just a fancy way of talking about how you organize the “imaginary” stuff you’re doing in your code. When programming, you deal with a bunch of seemingly imaginary objects, in a world you create yourself. A few paragraphs ago, we were “assigning” variables, and “creating” elements – where do all those things go? If they were physical objects, would you put them in a drawer ordered by color? hang them up on hangers? The analogy is a weak one, but it’s a rough approximation of what we do when we decide how to “structure” or data – if you pick the right structure, then you’ll be very happy with yourself when it comes time to actually use the data – i.e. if you are organizing clothes, hangers are perfect because when you use the clothes, you will likely want to pick between a large bunch of them, with each item fully visible.
To refresh - now that we’ve worked through the code for adding a new <div> element to the body, let’s try making a static version of the design we’re trying to achieve. Let’s pretend we knew exactly how to talk to reddit, and we pulled data from it – What would this data look like?.
Here’s what we know about the data we want:
This might be a good time to stop and read from a better source about data structures in javascript. Don’t worry, I’ll wait.
Now that you’re back, thinking about the first two requirements – we’re representing one thing, a “reddit post” if you will, but it’s got two pieces of information about it that we care about. We are thinking about one reddit post, but we need to know the image and the subreddit it belongs to. When you run into requirements like this, often the best solution is an Object, something like this:
{
  subreddit: "r/funny",
  title: "fake post",
  imageUrl: "https://reddit.com/path/to/some/img.png"
}
While we haven’t gone into how exactly to represent an image, we know we’ll need to do it, so we use a placeholder – which means this isn’t proper hose key value pairs
That’s the “value” of the data. Here’s that “value” referenced by varible:
var redditPost = {
  subreddit: "r/funny",
  title: "fake post",
  imageUrl: "https://reddit.com/path/to/some/img.png"
}

alert(redditPost.subreddit); // this would make "r/funny" appear in a dialog box
alert(redditPost.name); // this would make "fake post" appear in a dialog box
alert(redditPost.imageUrl); // this would make the URL appear in a dialog box
This should feel right (if it doesn’t now, don’t worry, it will become second nature eventually) – the subreddit property is like, a part of the redditPost you referenced. If you replaced . with “’s” it would read redditPost’s subreddit.
The last thing to think about for now would be the fact that we’re going to have more than one of these posts – and when you’re gonna have more than one of something, your go-to should be the Array (you also probably read about it in the data structures link earlier). So if we made an example of a fake array of these things, here’s what it’d look like:
var redditPostOne = {
  subreddit: "r/funny",
  title: "fake post 1",
  imageUrl: "https://reddit.com/path/to/some/img.png"
};

var redditPostTwo = {
  subreddit: "r/aww",
  title: "fake post 2",
  imageUrl: "https://reddit.com/path/to/another/different/img.png"
};

var redditPosts = [redditPostOne, redditPostTwo];
Look at how nice that looks, given how everything is named – we can clearly tell that the redditPosts array contains TWO reddit posts: first redditPostOne, then redditPostTwo. Now that we’ve got a pretty decent approvximation for how we’ll deal with the imaginary data, let’s take a look at making some of our own “for real”.
As briefly hinted to in Step 4, this button won’t actually pull the data from Reddit (for now), it’s going to use static data that we’ve written ourselves. It will, however, serve as a good enough placeholder for the function that we’ll run when we CAN actually pull stuff from reddit.
Since we don’t necessarily want the data showing up on page immediately, but we do want to check that it’s as we expect, let’s use console.log to log out the data and open the FF Inspector/Chrome DevTools to see the results of our work. But first, before we start writing code, let’s set up a way to trigger it – let’s add another button to our HTML page that we can use to run and test things:
<button onclick="getRedditPosts()">Get Reddit Posts</button>
This HTML should be obvious at this point, but you could drop this after the other button (which appends a div to the body). The whole thing might look like this (your code might be slightly different, which is OK):
<!DOCTYPE html>
<html lang="en">
    <head>
        <title>Have you even Reddit?</title>
        <meta charset="utf8"></meta>
        <meta name="viewport" content="width=device-width, initial-scale=1, maximum-scale=1"></meta>
        <link rel="stylesheet" href="./styles.css"></link>
    </head>
    <body>
        <h1 class="centered-text">Do you even Reddit?</h1>
        <button onclick="appendNewDivToBody()">Add DIV</button>
        <button onclick="getRedditPosts()">Get Reddit Posts</button> <!-- <--------- here's the new button -->
        <script type="text/javascript" src="./index.js"></script>
    </body>
</html>
Now that we’ve added this button to the HTML, let’s add the function it’s supposedly calling! Note that you can define a button that references to something that doesn’t yet exit in JS, your browser won’t get angry with you (but you might, if you forget later and try to use the button). Here’s what the function would look like:
function getRedditPosts() {
  // TODO: get reddit posts, actually
  // TODO: get mock list of reddit posts
}
OK, so now that we’ve got a skeleton, let’s fix that second TODO by putting in a mock version – we’ll borrow the code from Step 4:
function getRedditPosts() {
  var redditPostOne = {
    subreddit: "r/funny",
    title: "fake post 1",
    imageUrl: "https://reddit.com/path/to/some/img.png"
  };

  var redditPostTwo = {
    subreddit: "r/aww",
    title: "fake post 2",
    imageUrl: "https://reddit.com/path/to/another/different/img.png"
  };

  var redditPosts = [redditPostOne, redditPostTwo];
  console.log("Retrieved reddit posts:", redditPosts);
}
Yep, just like that. We’ve literally just put that code we made up into a function, and now it’s “producing data”! If you load up the page and click the button, you should be able to open up your ff inspector/chrome devtools and see the console.log we wrote appear. Here’s what it lookks like for me:
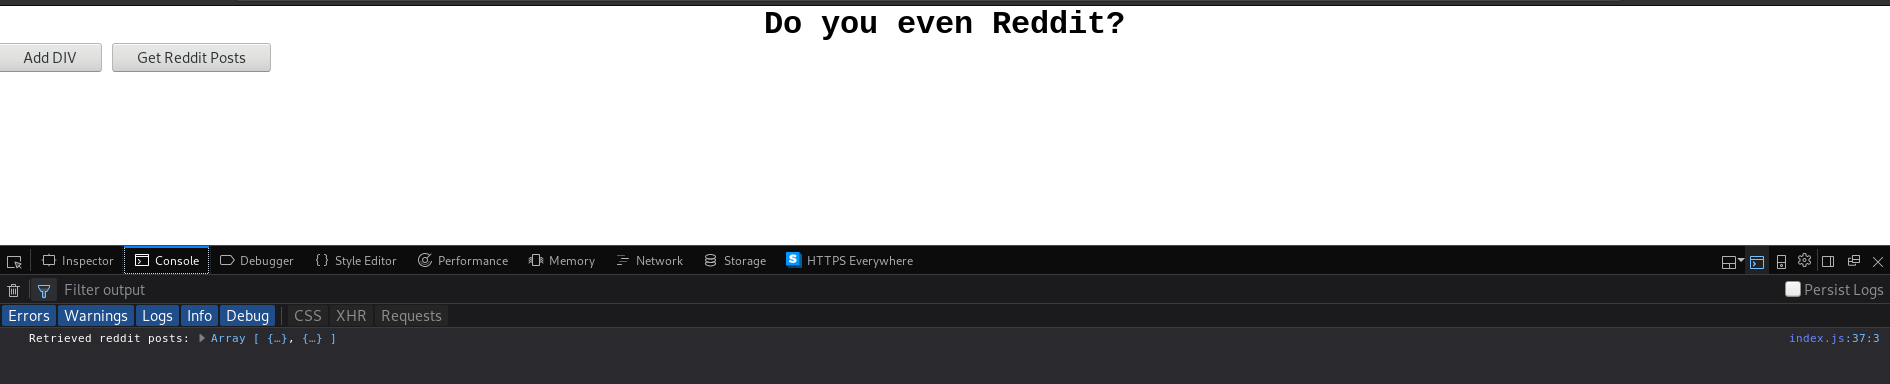
Don’t forget that you can click on the thing that was printed and look at it from the inspector/devtools! Todays browsers have some great support for exploring data structures that log to the console (using console.log).
This all is pretty great, except for the fact that inside that function isn’t where we want to USE the reddit posts. Given the name of the function, getRedditPosts(), all this function should do is retrieve the reddit posts. Rather than changing the name of the function and making it try to do more, let’s “compose” (use together) our functions, and find a way to use getRedditPosts() and a function like appendNewDivToBody() or something similar to make our quiz a reality.
Let’s make a new function that represents what we want to do: getRedditPostsAndDisplayOnPage. Take a crack at writing the function, stub out what it’s supposed to do with // TODO: blah blah and let’s compare notes.
I’m going to leave the task of creating a button that triggers this functionality to you – I won’t include the code here but given it’s almost the same as the other buttons we’ve made so far, you should be able to figure it out!
OK, so the pieces of the puzzle are starting to shape up (though right now a big piece is fake – the getRedditPosts function). We’ve got a function that “gets” reddit posts, but we need to actually Use the posts we got to display something on the page. To represent this intent, we’ve created the function getRedditPostsAndDisplayOnPage(), here’s what it looks like:
function getRedditPostsAndDisplayOnPage() {
  // TODO: get (fake) posts from reddit
  // TODO: put the posts on the page
}
This function is good, but it doesn’t go into enough detail. How about:
function getRedditPostsAndDisplayOnPage() {
  // TODO: get posts from reddit (currently fake)
  // TODO: turn the posts into elements we can show on the page (some kind of element that has only the image, and some subreddits to guess from?)
  // TODO: display the posts on the page
}
This gives us a better idea of the steps involved to get everything to work – don’t underestimate the importance of thinking like this, in the most basic terms, it’s a crucial skill.
It looks like we’ve got one (faked) piece of the puzzle, let’s slot our getRedditPosts() function into the first spot:
function getRedditPostsAndDisplayOnPage() {
  getRedditPosts();
  // TODO: turn the posts into elements we can show on the page (some kind of element that has only the image, and some subreddits to guess from?)
  // TODO: display the posts on the page
}
OK, so we’ve got our getRedditPosts(), but there’s something wrong here… Where’s the data it generated? We need it inside the getRedditPostsAndDisplayOnPage function but it’s just not there. we know we used a variable called redditPosts, so maybe if we console.log that it will be available?
function getRedditPostsAndDisplayOnPage() {
  getRedditPosts();
  console.log("the posts:", redditPosts);
  // TODO: turn the posts into elements we can show on the page (some kind of element that has only the image, and some subreddits to guess from?)
  // TODO: display the posts on the page
}
If you’ll check in your console, you’ll see that redditPosts is undefined. This is because variables that are declared inside a function are “bound” to that function. This means, the variables go away when the function is done. If we want to get data OUT of a function, we generally either need to:
return a variable containing the data we care aboutHere’s we’ll take the first approach – let’s modify getRedditPosts to return the posts that it created:
function getRedditPosts() {
  var redditPostOne = {
    subreddit: "r/funny",
    title: "fake post 1",
    imageUrl: "https://reddit.com/path/to/some/img.png"
  };

  var redditPostTwo = {
    subreddit: "r/aww",
    title: "fake post 2",
    imageUrl: "https://reddit.com/path/to/another/different/img.png"
  };

  var redditPosts = [redditPostOne, redditPostTwo];
  console.log("Retrieved reddit posts:", redditPosts);

  return redditPosts; // <---- Here it is!
}
That’s all it takes! Now let’s “assign” this result to a variable to we can use it in our getRedditPostsAndDisplayOnPage function:
function getRedditPostsAndDisplayOnPage() {
  var retrievedPosts = getRedditPosts(); // NOTE the rename to "retrievedPosts", this offers a little bit of context on what this variable represents, which is good
  console.log("the posts:", retrievedPosts);
  // TODO: turn the posts into elements we can show on the page (some kind of element that has only the image, and some subreddits to guess from?)
  // TODO: display the posts on the page
}
NOTE It’s totally fine to give the posts a new name/variable (e.g. retrievedPosts), it’s got nothing to do with the redditPosts variable that we were using inside of getRedditPosts() when we called it. The two parts of the code are in different [lexical scope][wiki-lexical-scope]s.
Now, when you click the button you should see something like this:

Note There are TWO console.logs being run here, one is inside getRedditPostsAndDisplayOnPage and one is inside getRedditPosts (which is called from getRedditPostsAndDisplayOnPage), despite pressing the button only ONCE.
OK, so we’ve got the fake posts, let’s see if we can start working on that next step, turning them into elements (let’s say <div>s), that represent the reddit content on the page.
OK so up until now we’ve just printed the faked posts to the console, let’s go about actually making them into divs that show up on the page. We’re going to follow the pattern before of creating an element and appending it to the <body> tag, but this time, that element won’t just be some random thing, it will represent a reddit post!
Let’s write a function that “takes” (as a parameter) a fake reddit post object, and creates a div that we can append to the <body> tag. Here’s what we can start with:
function makeRedditPostDiv(post) {
    var div = document.createElement("div");
    return div;
}
At this point, every post that goes into that function will come out as an empty <div>. Obviously, we’ll want more than an empty div, so let’s edit the element we created before we return it out of the function:
function makeRedditPostDiv(post) {
    var div = document.createElement("div");

    div.innerHTML = "<h2>" + post.title + "</h2>"; // Show the post title
    div.innerHTML += "<img src=\"" + post.imageUrl + "\"></img>"; // Add the associated image, note the use of backslash escapes since the HTML includes double quotes

    return div;
}
Now, every post that comes through this function turns into a div which contains a <h2> title which is the post’s name, and an image. We haven’t handled adding them to the page yet, but let’s take a look at where we’re going to actually use this function first.
Of course, note that reloading the page won’t change anything since we haven’t hooked any of this functionality up, but you certainly should get in the habit of opening the page and at least checking the console to ensure no new errors have popped up.
Let’s go back to the spot where we got all the fake reddit posts using getRedditPosts, that’s where we’re going to want to turn them into divs. We can now get rid of one of the TODOs, let’s turn every post we receive into a div.
Here’s what the code would look like:
function getRedditPostsAndDisplayOnPage() {
  var retrievedPosts = getRedditPosts();
  console.log("the posts:", retrievedPosts);

  var postDivs = [];
  for (var i= 0; i < retrievedPosts.length; i++) {
    postDivs.push(makeRedditPostDiv(retrievedPosts[i]));
  }

  // TODO: display the posts on the page
}
So there we’re using the for loop construct in Javascript (you can [read more about looping @ MDN][mdn-loops]). Here’s a description of what this code hopes to accomplish.
for loop to go through the list of postsmakeRedditPostDiv) one post (the post @ retrievedPosts[i])Step 3 happens lots of times (as many times as there are posts in retrievedPosts.
We haven’t dealt with how we’re going to display this on the page yet, but let’s try and do some testing to make sure this code does what we want. How about we console.log the length of both lists? if the code worked, the lists should have the same length. The modified code would look like this:
function getRedditPostsAndDisplayOnPage() {
  var retrievedPosts = getRedditPosts();
  console.log("the posts:", retrievedPosts);

  var postDivs = [];
  for (var i= 0; i < retrievedPosts.length; i++) {
    postDivs.push(makeRedditPostDiv(retrievedPosts[i]));
  }

  console.log("retrievedPosts.length", retrievedPosts.length);
  console.log("postDivs.length", postDivs.length);

  // TODO: display the posts on the page
}
Of course, to trigger this code, you’ll need to click the “Get and display posts” button we made ealrier (whose onclick attribute triggers the getRedditPostsAndDisplayOnPage function).
Here’s what that looks like:

OK great (for me at least)! It looks like the lengths do match, which is exactly what we want. You could also print out the lists themselves instead of just their lengths to be more thorough with your testing (and get to explore what the objects look like in the console) – I’ll leave that an an exercise for the reader.
Now that we’re generating some divs, there’s one more thing we should do before we move on – we are making a quiz game right? We need to hook up some sort of way to vote on which subreddit the
Before we actually put the divs on the page, let’s make the voting buttons that represent the choices for which subreddit the image came from.
To keep things simple, let’s make three buttons that cause voting to happen: one for r/aww, r/funny, and r/gifs.
So there’s a bit of a dynamic/complicated problem here – we need to generate these buttons that will have onclick handlers which do stuff we want to do – however up until now, we’ve only used onclick to point at global functions (functions declared in our script), but these checks are dynamic – we don’t really want to create a function for each of post – we really want to create an individual function to check for the post whose div is being made.
We don’t necessarily need these small checker functions to have names – the concept we want in this case is an [Anonymous Function][mdn-anonymous-functions].
Looking more at the MDN documentation for the onclick handler, it looks like it can be used with anonymous functions as well, as per their example:
p.onclick = function(event) { alert(“moot!”); };
Here they’re using a created element p (as in var p = document.createElement('button') for example), and giving it an onclick attribute using Javascript itself!
Let’s create some <button> elements, give them anonymous onclick functions directly (using the javascript interface to onclick) and see if we can inject them into the <div> element. The code should go inside makeRedditPostDiv and look something like this:
  var buttonElem = document.createElement("button");
  buttonElem.innerHTML = "r/aww";
  buttonElem.onclick = function() {
    if (post.subreddit === "aww") {
      // TODO: What happens if they're right?
    } else {
      // TODO: does anything happen the person is wrong
    }
  };
This example does it for r/aww, and there are a few things to note:
post because it’s available in the parent function (makeRedditPostDiv)Writing this code has left us with 2 more questions! What should happen when the user is right or wrong? Well, if they’re right their score should go up at least… Oh right, we haven’t dealt with score at all!
Let’s handle the score in the simplest way we can – we’re going to introduce a global variable (a variable declared at the same scope as all the other functions, just in the script file, let’s call it QUIZ_SCORE (it’s good practice to make your global variable name all capitals so when you use them you know the variable is a global one, and not one that was created inside a function.
At the top of index.js, you can add the variable declaration:
var QUIZ_SCORE = 0;
So now we have a variable QUIZ_SCORE, accessible from any function on the page or anywhere, because it’s been declared at the “top level” (just in the file itself), let’s make sure it gets incremented when someone clicks a right answer:
  var buttonElem = document.createElement("button");
  buttonElem.innerHTML = "r/aww";
  buttonElem.onclick = function() {
    if (post.subreddit === "aww") {
      QUIZ_SCORE = QUIZ_SCORE + 1; // also could be written as QUIZ_SCORE++
    }
  };
Notice that I got rid of the else branch since I didn’t need it, we’ll just increase scores for people who get them right, no need to take away from people who get questions wrong! Now let’s replicate this code for the other two choices (r/funny and r/gifs):
function makeRedditPostDiv(post) {
  var div = document.createElement("div");

  div.innerHTML = "<h2>" + post.title + "</h2>"; // Show the post title
  div.innerHTML += "<img src=\"" + post.imageUrl + "\"></img>"; // Add the associated image, note the use of backslash escapes since the HTML includes double quotes

  // Make left button
  var leftButton = document.createElement("button");
  leftButton.innerHTML = "r/aww";
  leftButton.onclick = function() {
    if (post.subreddit === "r/aww") {
      QUIZ_SCORE = QUIZ_SCORE + 1;
    }
  };

  // Make middle button
  var middleButton = document.createElement("button");
  middleButton.innerHTML = "r/funny";
  middleButton.onclick = function() {
    if (post.subreddit === "r/funny") {
      QUIZ_SCORE = QUIZ_SCORE + 1;
    }
  };

  // Make right button
  var rightButton = document.createElement("button");
  rightButton.innerHTML = "r/gifs";
  rightButton.onclick = function() {
    if (post.subreddit === "r/gifs") {
      QUIZ_SCORE = QUIZ_SCORE + 1;
    }
  };

  // Add the buttons to the div
  div.appendChild(leftButton);
  div.appendChild(middleButton);
  div.appendChild(rightButton);

  return div;
}
Note that I also added some code to the bototm of there to append the <button>s to the <div> element we are creating using trusty appendChild that we’ve been using on <body>.
NOTE The great thing about making a function like makeRedditPostDiv is that even though we changed how it works, we don’t have to change anywhere that was using it! getRedditPostsandDisplayOnPage runs just like normal without any changes.
Global variables are present in many forms of programming. While it’s generally bad practice to use a large number of global variables, they are sometimes necessary in contexts like these where we don’t have some sort of isolated store of the state of the game. While we could go off and create some sort of container for the state of the game, since there’s really only the score to keep track of, it makes sense to pick the simple option here. You can read more about global variables on Wikipedia.
OK whew, we’ve written a lot of code but haven’t seen it do any work or tested it yet, let’s put some elements on the page and see how things have gone! Let’s head back to the getRedditPostsAndDisplayOnPage function and take care of that final TODO, displaying the posts on the page (and also we can delete the console.logs from earlier). Trusty appendChild is what we need here:
function getRedditPostsAndDisplayOnPage() {
  var retrievedPosts = getRedditPosts();
  console.log("the posts:", retrievedPosts);

  var postDivs = [];
  for (var i= 0; i < retrievedPosts.length; i++) {
    postDivs.push(makeRedditPostDiv(retrievedPosts[i]));
  }

  var elementsWithNameBody = window.document.getElementsByTagName("body");
  var bodyElem = elementsWithNameBody[0];
  for(var j = 0; j < postDivs.length; j++) {
    bodyElem.appendChild(postDivs[j]);
  }
}
OK, so here we combine the for loop we used previously, but this time, we use appendChild inside to insert all the generated <div>s that represent reddit posts to <body>. Let’s fire it up and see what happens!

For me the images are broken links because I didn’t put real images in, but it looks like it’s showing the posts! There are lots of little things wrong still, if you click the button multiple times the same entries show up repeatedly, but for now it’s great to see it working!
Let’s do a bit more of a thorough confirmation:
QUIZ_SCORE (the global we used) is 1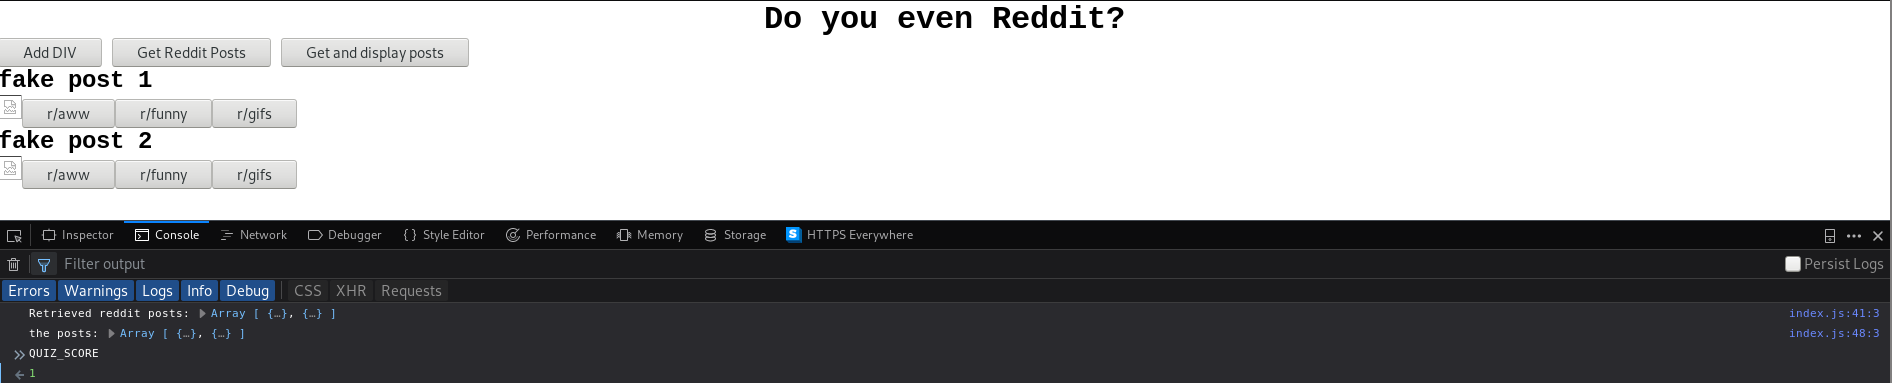
Alright, looks like the QUIZ_SCORE is what we expect it to be! we now have a semi-working local quiz game!
Now that we have the score and it seems to be working properly (at the very least it went up from 0 once), let’s show it to the user by displaying it on the page. In addition to just displaying it, we’ll probably also want the score to update whenever it changes.
Let’s do this the simplest way first, then refactor the code a little bit to make it better. The simplest possible way we can do this is to go to everywhere the score is set or changed, and update some <div> (or <span>) on the page to reflect the new value.
Let’s put the score into the markup of the page on index.html:
...  beginning of the html code ...
  <body>
    <h1 class="centered-text">Do you even Reddit?</h1>
    <h2 class="centered-text">Score: <span id="score"></span></h2>
... rest of the html code ...
Note that iused a <h2> for the “Score” announcement to make it nice and big (but also smaller than the page title), and included a span inside the <h2> with an id of “score” to make it easy to get at later (with document.getElementById or document.querySelector).
On the JS side, here are some bits of code that touched QUIZ_SCORE that I’ve changed and marked:
var QUIZ_SCORE = 0;
document.querySelector("#score").innerHTML = QUIZ_SCORE;
  // Make middle button
  var middleButton = document.createElement("button");
  middleButton.innerHTML = "r/funny";
  middleButton.onclick = function() {
    if (post.subreddit === "r/funny") {
      QUIZ_SCORE = QUIZ_SCORE + 1;
      document.querySelector("#score").innerHTML = QUIZ_SCORE;
    }
  };
Notice that it’s the exact same line going everywhere – document.querySelector("#score").innerHTML = QUIZ_SCORE;.
By default, the way HTML/JS interaction does not automatically track and update variables as they change on the JS side in the HTML page itself. If you have a piece of data on the JS side that you want to display on the page (HTML side) you have to update it yourself. This is part of the appeal of libraries like jQuery and Vue and ReactJS, they can give you easier and more principled ways to achieve this effect, often referred to as bindings (after the fact that you’re binding a HTML element to a JS variable).
If you continue the work and ensure that the “score” <span> is updated every time QUIZ_SCORE, you should be able to refresh the page and see the score change in realtime!
Now let’s make it a bit better. Since we see that we’ve pasted the same line basically everywhere, let’s abstract a little bit – let’s call a specific global function every time we want to update the quiz score, and handle any necessary updates in there. It could look something like this:
function updateScore(newScore) {
  QUIZ_SCORE = newScore;
  document.querySelector("#score").innerHTML = QUIZ_SCORE;
}
With this function in place we can replace the ~2 liners we were pasting everywhere with one:
  // Make middle button
  var middleButton = document.createElement("button");
  middleButton.innerHTML = "r/funny";
  middleButton.onclick = function() {
    if (post.subreddit === "r/funny") {
      updateScore(QUIZ_SCORE + 1)
    }
  };
Now, calling updateScore automatically changes the page score, and we don’t have to worry about it! This is a small glimpse of the power of abstraction (in this case with functions) gives us. It is powerful, but remember to use it wisely – too much abstraction can also be a bad thing.
Up until now we’ve been using fake posts and hand-picked images – let’s take it up a notch, and actually connect to reddit to pull the posts! The first place we’ve got to look is the getRedditPosts function. In the past we wrote it as a function so that we could change
how it worked later – it is now that time, let’s make this function actually reach out to reddit.com and pull information.
Before we go into how it’s done, I’d encourage you to think about what we’re about to embark on – we’re about to try to make a connection to another site, retrieve some data, and come back to our site and display it. These days it might seem really obvious, but being able to do this from javascript wasn’t always the case – Asynchronou JAvascript + XML (AJAX) was invented to make this a possbility – before it existed, once a page loaded you had what you had. As noted in the MDN article, JSON is used more these days than XML but people still call it “AJAX” (or “AJAX requests”).
TODO: COMPLETE THIS
getRedditPosts() function with sometihng that actually calls out to redditThis page is funtional, but severely lacking in an aesthetic sense. We’ve ignored style up until now in favor of funcitonality and getting the thing working, but now that it’s done, take some steps to get it looking good! Let out your inner CSS god and shape the page as you see fit. Keep an eye on User Experience (UX) – just because you can make the entire page strobe doesn’t users will enjoy it.
Remember that just as you can open up the console and edit the Javascript or HTML of the page, anyone on the internet with sufficient skill can as well. Anyone can edit your page locally in their browser, so they could fake their quiz scores, change the questions, or change the site! Remember that backends that take information from frontends (like this quiz game) need to make sure they don’t trust what is sent implicitly (you should always verify).
In a more mature application with a backend, the quiz checks and score would be handled by the web server (which is serving the site), not on the webpage locally. The frontend (quiz webpage) could then AJAX request the backend (web server) for bits of information like the score as necessary.
There are lots of bugs in this initial approach – here are a few and how you can remedy them:
You might have noticed that if you click the same right answer on a post multiple times, with the way the code is currently written your score will increase! This is obviously not ideal, so find a way to keep track of which questions have been answered and which haven’t.
HINT: Global state, as well as finding a way to identify each quiz question (image) uniquely will likely be very important. Objects (AKA hashes, dictionaries, lookup tables) are your friend.
It would also be nice if you could disable the buttons on a question immediately after one is picked (whether the right or wrong one is picked). This sort of builds on th previous bugs
HINT: To make the solution really nice, also consider the styling applied to the <div> itself. Answered questions should communicate to the user somehow that they’ve already been answered. CSS classes (and element.className) should be of great help.