DDG search drop in powered by ddg.patdryburgh.com
tl;dr - A drive attached to a Hetzner dedicated server failed, my drive has both mdraid and ZFS set up so I restored thanks to Hetzner documentation and Joyent’s nice high level docs on ZFS drive replacement combined with the OpenBSD Handbook’s section on ZFS and OpenZFS (ZFS On Linux) Docs.
Recently I’ve undergone the pretty traumatic expansion of my Kubernetes control plane from single controller (which was also acting as a node in the cluster and running workloads) to a 3 Hetzner Cloud machine Highly Available (“HA”) setup. During this transition one of the drives in a node actually failed – the node was not the node being reconfigured but nonetheless Murphy’s Law saw fit to strike me while I was in the middle of a pretty complicated process (a post is coming about that too!).
In the past when I’ve had drives die, I was in a setup where it was easy to actually completely rebuild the machine, so once the replacement was done I could just re-run my automation to provision everything. Unfortunately, this time there were stateful workloads running on the machine with the dead disk. Obviously, this requires recovery and restoration of the workloads that were actually running and getting them access to the data they had.
Well what does it look like when you have a drive failure? Here are a few things:
mdraid – your reads will silently go to the last remaining drive and it’s up to you to check/know that you’re running in a degraded state and replace the drive ASAP.mdraid (“LVM over mdraid”) => LVM will serve writes from the one disk, because underlying mdraid (ex. /dev/md0) is still serving reads/writesmdraid since it will allow reads on the remaining disk. This is why Hetzner uses RAID1 by default on their disks – it’s a much safer option.THe zpool list command returned no poools at all, and obviously zfs list will return no datasets. In the past I have had accidently ZFS version downgrades (the Ubuntu packaged version of ZFS is 0.8.3 but I run 2.1.1 and making sure the kernel uses the custom-installed 2.1.1 (and not the ubuntu provided 0.8.3) can be tricky. Previous ZFS versions can’t read pools administered by newer versions, so that’s one reason the pool might not show up.
The first step for me was to double-check the version (zfs version) to see if that was the reason the pools weren’t showing up:
root@node-3 ~ # zfs version
zfs-2.1.1-1
zfs-kmod-2.1.1-1
OK so looks like I at least don’t have the accidental-ZFS-version-degrade problem!
Other nodes were fine so I knew this wasn’t a shared configuration problem, so I went ahead and checked the disk layout (I run a somewhat non-standard layout):
$ lsblk
root@node-3 ~ # lsblk
NAME        MAJ:MIN RM   SIZE RO TYPE  MOUNTPOINT
nvme0n1     259:0    0   477G  0 disk
├─nvme0n1p1 259:1    0    32G  0 part
│ └─md0       9:0    0    32G  0 raid1 [SWAP]
├─nvme0n1p2 259:2    0     1G  0 part
│ └─md1       9:1    0  1022M  0 raid1 /boot
├─nvme0n1p3 259:3    0   128G  0 part
│ └─md2       9:2    0 127.9G  0 raid1 /
├─nvme0n1p4 259:4    0     1K  0 part
└─nvme0n1p5 259:5    0   316G  0 part
Uhhh where the heck is nvme1n1? This machine is an AX41-NVME Hetzner drive which comes with two NVMe SSDs, normally called nvme0n1 and nvme1n1 at the OS level (available @ /dev/nvme0n1, etc). Here’s what it normally looks like just for reference:
root@node-5 ~ # lsblk
NAME        MAJ:MIN RM   SIZE RO TYPE  MOUNTPOINT
zd0         230:0    0   150G  0 disk  /var/lib/longhorn
nvme0n1     259:0    0   477G  0 disk
├─nvme0n1p1 259:2    0    32G  0 part
│ └─md0       9:0    0    32G  0 raid1 [SWAP]
├─nvme0n1p2 259:3    0     1G  0 part
│ └─md1       9:1    0  1022M  0 raid1 /boot
├─nvme0n1p3 259:4    0   128G  0 part
│ └─md2       9:2    0 127.9G  0 raid1 /
├─nvme0n1p4 259:5    0     1K  0 part
└─nvme0n1p5 259:6    0   316G  0 part
nvme1n1     259:1    0   477G  0 disk
├─nvme1n1p1 259:7    0    32G  0 part
│ └─md0       9:0    0    32G  0 raid1 [SWAP]
├─nvme1n1p2 259:8    0     1G  0 part
│ └─md1       9:1    0  1022M  0 raid1 /boot
├─nvme1n1p3 259:9    0   128G  0 part
│ └─md2       9:2    0 127.9G  0 raid1 /
├─nvme1n1p4 259:10   0     1K  0 part
└─nvme1n1p5 259:11   0   316G  0 part
Oh shit. A drive is missing completely (the kernel hides drives that are sufficiently broken). After a small freak out, I can rest relieved because this is the very reason I’ve agonized over the [disadvantages/advantages of disassembling software RAID on Hetzner machines. I’m running RAID1 like a sensible sysadmin for this very eventuality, so I can survive single hard drive failures.
Hard drive failures are pretty low on my “storage hierarchy of needs”:
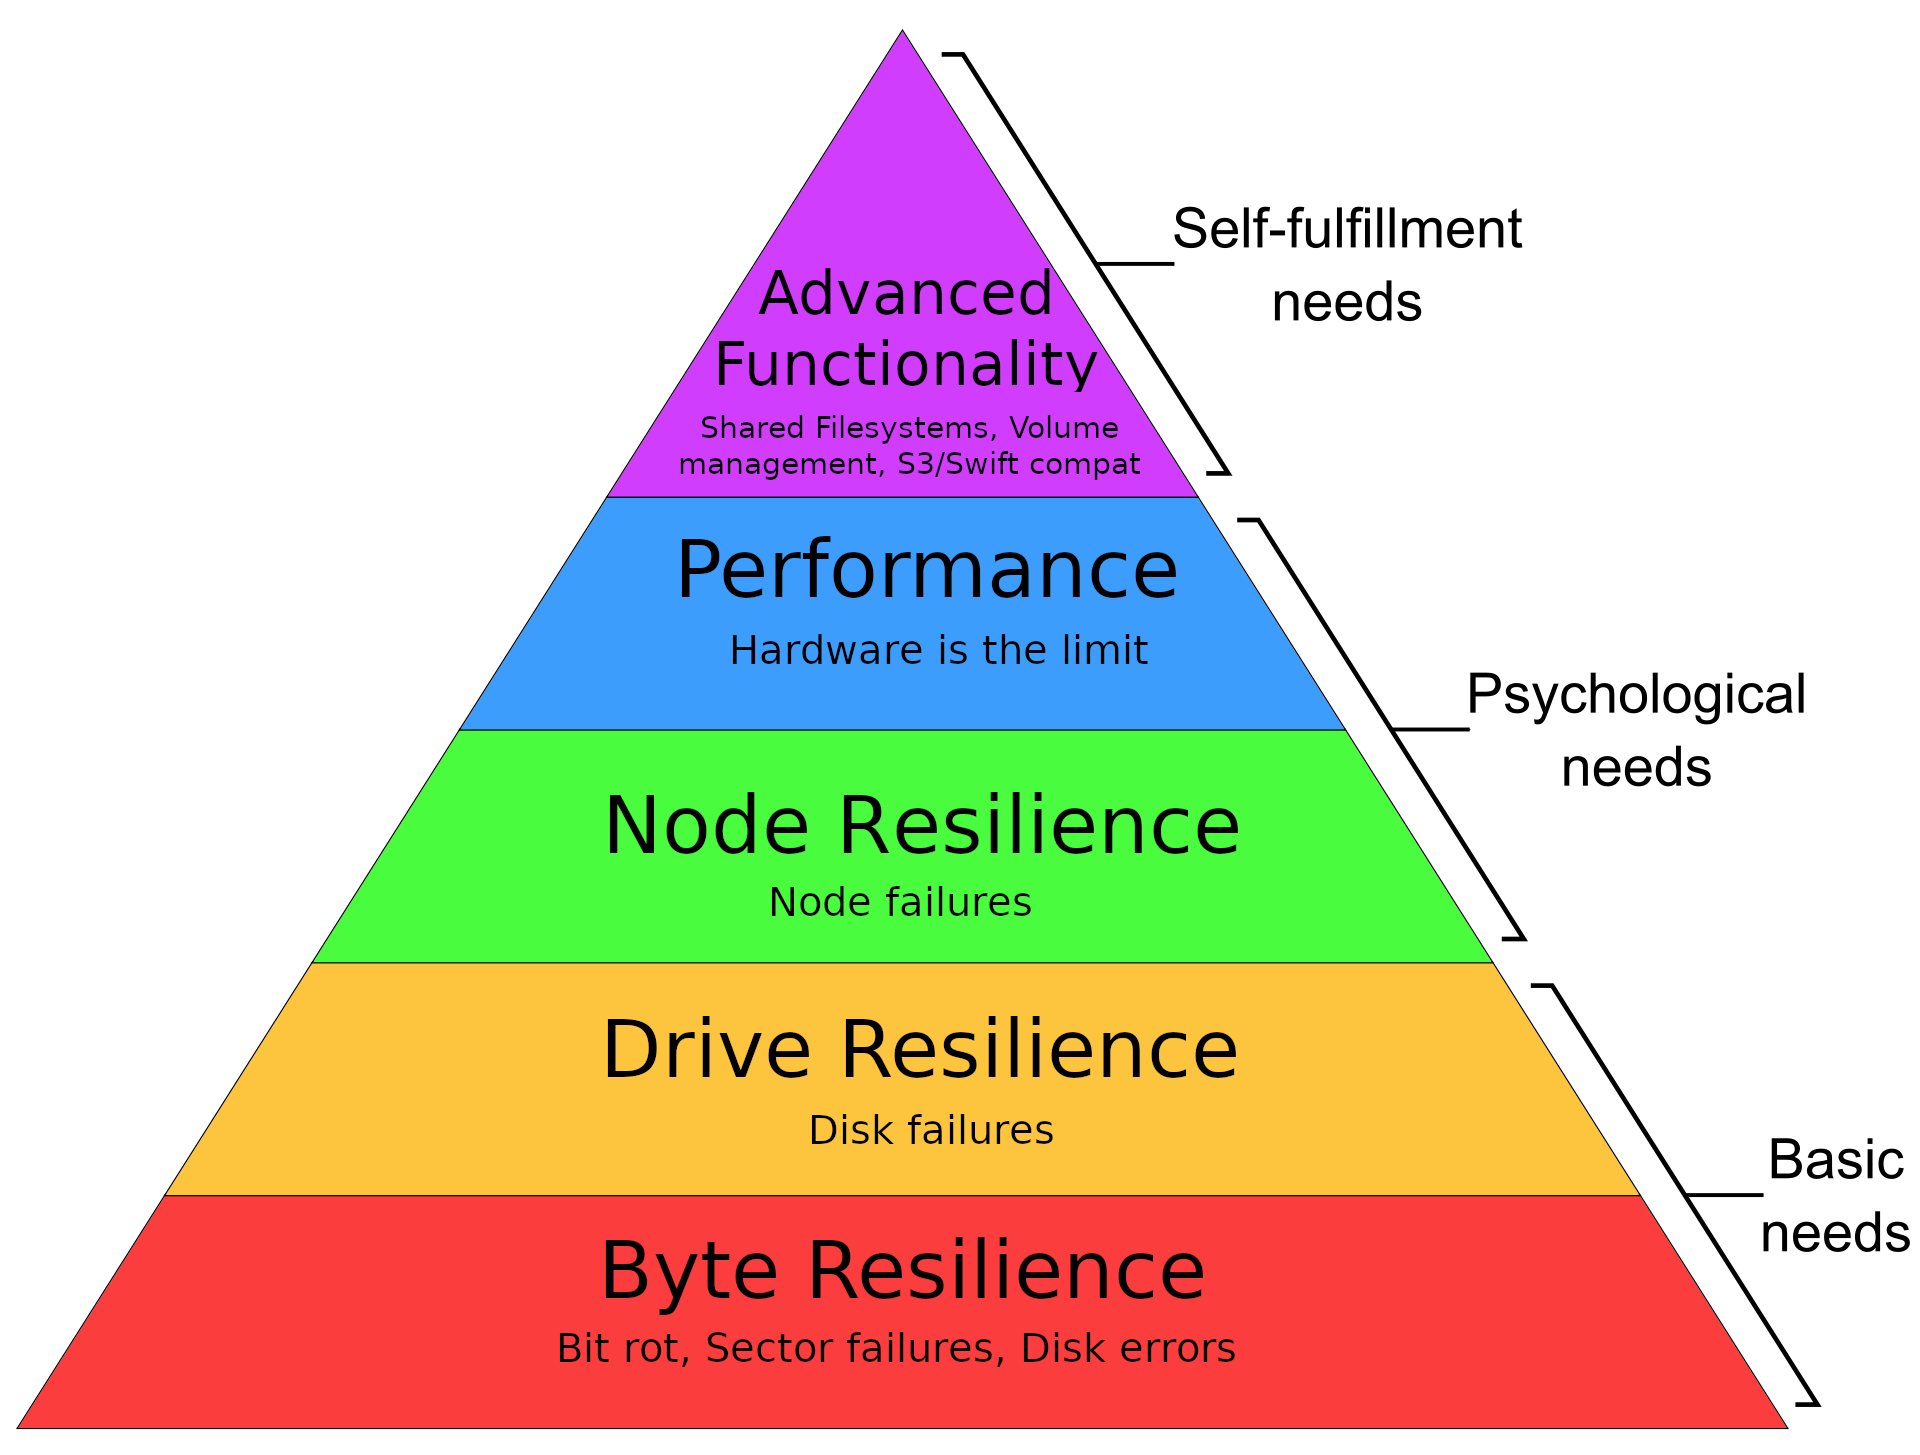
NOTE If you’re wondering when you may want to actually disassemble software RAID1 on a provider like Hetzner, I think it makes sense when you’re running a distributed storage system like Ceph – Ceph makes sure multiple copies of every bit of data makes it to various nodes (and resultingly various drives) so even if you were to lose an entire drive from one node, workloads should still be able to run as other copies will exist. This also requires running your OS off of a drive that is not those drives (ex. running Alpine Linux from memory), but that’s a post for another day.
I started with ZFS because it is arguably the most “risky” part of this level of my stack – not that ZFS is risky in absolute terms but compared to in-kernel software like mdraid or LVM that are well understood and common, it is. A lot of my attention was geared towards understanding and seeing how ZFS reacts to this kind of failure and building good intuition on how to use it properly.
Searching produced a great FreeBSD thread which wasn’t a bad place to start, and once I ran zpool import I was able to see the zpools that were there but not automatically imported:
root@node-3 ~ # zpool import
   pool: tank
     id: 7705949272249162819
  state: DEGRADED
status: One or more devices contains corrupted data.
 action: The pool can be imported despite missing or damaged devices.  The
        fault tolerance of the pool may be compromised if imported.
   see: https://openzfs.github.io/openzfs-docs/msg/ZFS-8000-4J
 config:

        tank           DEGRADED
          mirror-0     DEGRADED
            nvme0n1p5  ONLINE
            nvme1n1p5  UNAVAIL
Well this confirms the problem – clearly the missing disk is causing the pool to not be imported (as you might imagine – this is equivalent to if the disk was present but damaged).
Hetzner does use reasonably worn drives on their dedicated disks – as far as I know they aim to maximize utility and minimize waste of their hardware which is great for me (I get great deals on good-enough hardware) and the environment (they use drives as long as possible). This however means that drive failure on dedicated machines happens more frequently
Luckily Hetzner is well prepared for this and they have a support form for reporting dead drives:
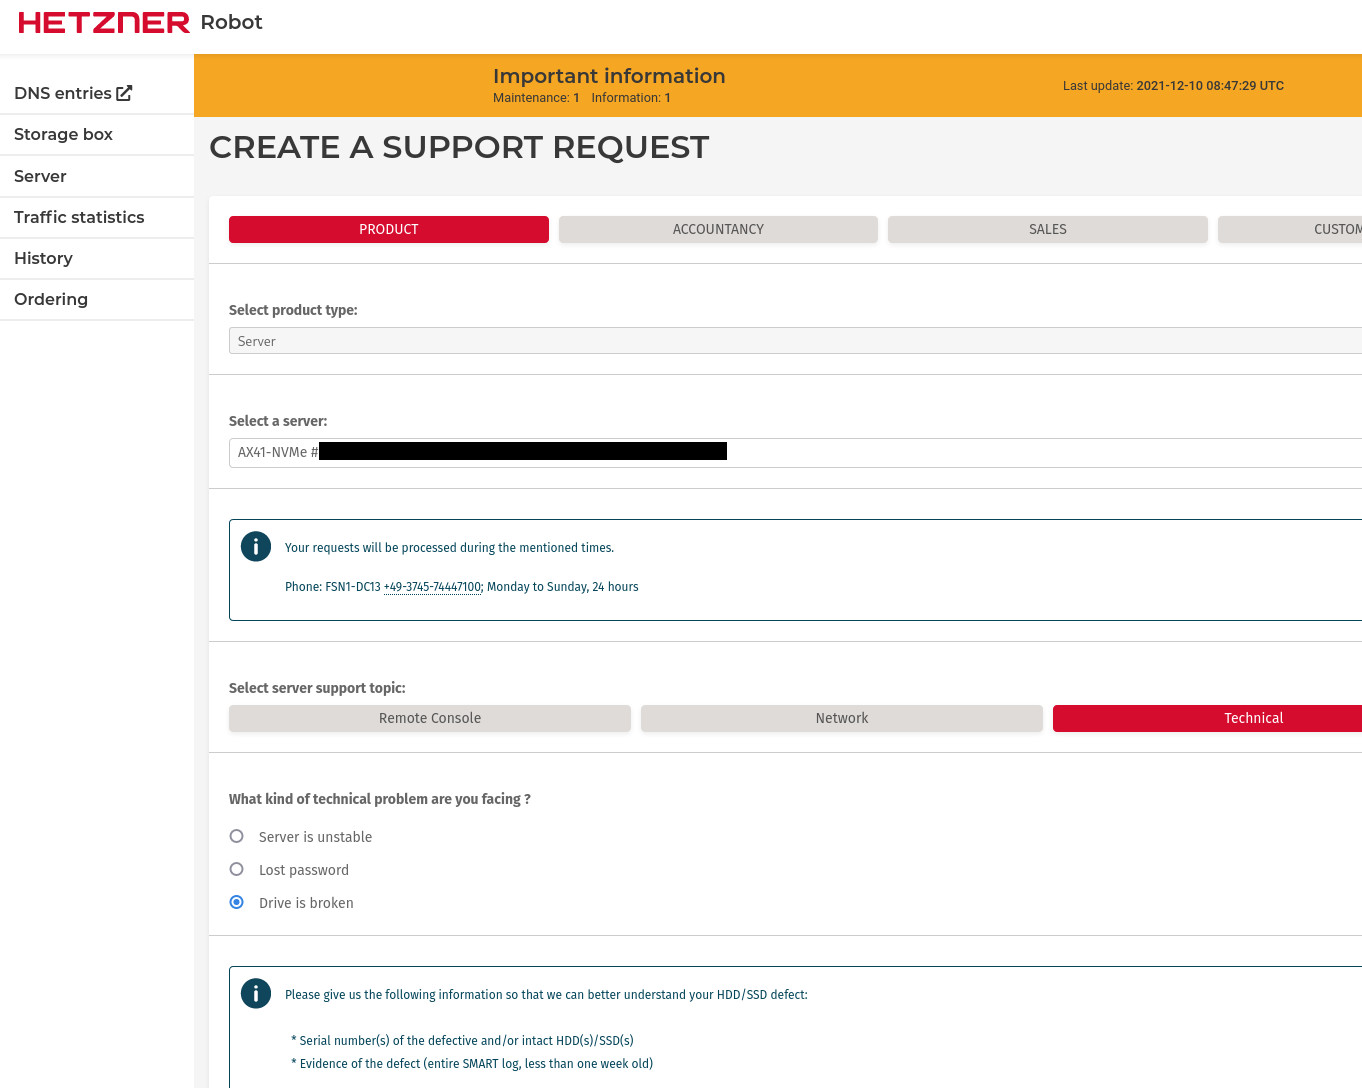
With the form you can specify either the intact drive or the dead drive. I specified the intact drive, since I didn’t know how to retrieve the UUID of the drive that wasn’t being surfaced by the OS.
Hetzner replaced the drive in <30 minutes from when I filed the tickets (about 20 minutes!), so outstanding service there. This would have resulted in about that much downtime for the data on the node, so that’s not great, but as noted in the “storage hierarchy of needs” illustration, if I want robustness to node failures (which this basically becomes) I have a few options:
There’s no free lunch here as well, but at least Hetzner replacing the drive is “free”!
mdraid & ZFS)Once a new drive is present we can at least confirm it’s present
root@node-3 ~ # lsblk
NAME        MAJ:MIN RM   SIZE RO TYPE  MOUNTPOINT
nvme1n1     259:0    0   477G  0 disk
nvme0n1     259:1    0   477G  0 disk
├─nvme0n1p1 259:2    0    32G  0 part
│ └─md0       9:0    0    32G  0 raid1 [SWAP]
├─nvme0n1p2 259:3    0     1G  0 part
│ └─md1       9:1    0  1022M  0 raid1 /boot
├─nvme0n1p3 259:4    0   128G  0 part
│ └─md2       9:2    0 127.9G  0 raid1 /
├─nvme0n1p4 259:5    0     1K  0 part
└─nvme0n1p5 259:6    0   316G  0 part
Hurray, welcome back nvme1n1! As noted earlier, my drive setup is bit complicated – I’m using a combination of both mdraid (boot, root disk, swap, workload storage) and ZFS (workload storage). Both drives have partitions that are used by both mdraid and ZFS, with different partitions used for different disks. The new drive knows nothing of the setup for either storage tool, and is just an empty “512GB” NVMe drive.
- Now that we know we've got the new drive in, we need to replicate the partition structure before we can start restoring the individual RAID1 implementations we have onboard (mdraid and ZFS).
- Hetzner's docs (LINK) go into how to do this, but I'll partially reproduce it here.
- NOTE: that if you want to do a hard wipe of the new disk, this would be the time to do so!
- If you have MBR (which is likely on Hetzner at least), for a single disk you can backup and restore (to another disk):
  #+BEGIN_SRC bash
To backup the existing partition structure:
$ sfdisk --dump /dev/nvme0n1 > nvme0n1.mbr.bak # feel free to open this file, it's text!
To “restore” the partition structure you backed up (to another disk):
sfdisk /dev/nvme1n1 < nvme0n1.mbr.bak # /dev/nvme1n1 is the new empty disk being restored
If you’re running GPT you’ll want to use sgdisk instead to backup the xisting partition structure:
$ sgdisk --backup=nvme0n1.gpt.bak /dev/nvme0n1 # this file is *not* textual.
To restore (possibly to another disk) with GPT:
$ sgdisk --load-backup=nvme0n1.gpt.bak /dev/nvme1n1 # /dev/nvme1n1 is the new empty disk being restored
Once you’ve used either sfdisk or sgdisk to restore the partition structure, you should see the following after running lsblk:
root@node-3 ~ # lsblk
NAME        MAJ:MIN RM   SIZE RO TYPE  MOUNTPOINT
nvme1n1     259:0    0   477G  0 disk
├─nvme1n1p1 259:7    0    32G  0 part
├─nvme1n1p2 259:8    0     1G  0 part
├─nvme1n1p3 259:9    0   128G  0 part
├─nvme1n1p4 259:10   0     1K  0 part
└─nvme1n1p5 259:11   0   316G  0 part
nvme0n1     259:1    0   477G  0 disk
├─nvme0n1p1 259:2    0    32G  0 part
│ └─md0       9:0    0    32G  0 raid1 [SWAP]
├─nvme0n1p2 259:3    0     1G  0 part
│ └─md1       9:1    0  1022M  0 raid1 /boot
├─nvme0n1p3 259:4    0   128G  0 part
│ └─md2       9:2    0 127.9G  0 raid1 /
├─nvme0n1p4 259:5    0     1K  0 part
└─nvme0n1p5 259:6    0   316G  0 part
Hurray, nvme1n1 looks a little like the other drive. There are some subtle differences but it’s overall a similar layout. Now let’s get to actually restoring the data that was on the partitions to begin with.
mdraid dataHetzner’s got fantastic documentation on exactly how to restore after a failure – their guide is excellent (earlier instructions are based off of it), and expanding on it here would only be incomplete reflection of the work they’ve already done, so I’ll only reproduce a tiny bit.
With the right partition structure in place, we can restore each of the 3 mdraid (md0,md1,md2) drives that exist on the other drive. For me that looks like this, make sure to match up the partitions correctly!:
mdadm /dev/md0 -a /dev/nvme1n1p1
mdadm /dev/md1 -a /dev/nvme1n1p2
mdadm /dev/md2 -a /dev/nvme1n1p3
THe output looks like the following:
root@node-3 ~ # mdadm /dev/md0 -a /dev/nvme1n1p1
mdadm: added /dev/nvme1n1p1
root@node-3 ~ # mdadm /dev/md1 -a /dev/nvme1n1p2
mdadm: added /dev/nvme1n1p2
root@node-3 ~ # mdadm /dev/md2 -a /dev/nvme1n1p3
mdadm: added /dev/nvme1n1p3
mdadm automatically springs to life and does the rest! You can follow progress by looking at /proc/mdstat:
root@node-3 ~ # cat /proc/mdstat
Personalities : [raid1] [linear] [multipath] [raid0] [raid6] [raid5] [raid4] [raid10]
md0 : active raid1 nvme1n1p1[2] nvme0n1p1[0]
      33520640 blocks super 1.2 [2/1] [U_]
      [=========>...........]  recovery = 45.3% (15210880/33520640) finish=1.5min speed=200219K/sec

md2 : active raid1 nvme1n1p3[2] nvme0n1p3[0]
      134085632 blocks super 1.2 [2/1] [U_]
        resync=DELAYED
      bitmap: 1/1 pages [4KB], 65536KB chunk

md1 : active raid1 nvme1n1p2[2] nvme0n1p2[0]
      1046528 blocks super 1.2 [2/1] [U_]
        resync=DELAYED

unused devices: <none>
If you want to watch this live, you can run watch -n1 cat /proc/mdstat, but otherwise it’s easy to see how far mdadm is in the process of “resilvering”. When mdadmis completely finished you should see output like the following:
root@node-3 ~ # cat /proc/mdstat
Personalities : [raid1] [linear] [multipath] [raid0] [raid6] [raid5] [raid4] [raid10]
md0 : active raid1 nvme1n1p1[2] nvme0n1p1[0]
      33520640 blocks super 1.2 [2/2] [UU]

md2 : active raid1 nvme1n1p3[2] nvme0n1p3[0]
      134085632 blocks super 1.2 [2/2] [UU]
      bitmap: 1/1 pages [4KB], 65536KB chunk

md1 : active raid1 nvme1n1p2[2] nvme0n1p2[0]
      1046528 blocks super 1.2 [2/2] [UU]

unused devices: <none>
That [UU] (not to be confused with “UwU”) means we’re golden (as opposed to [U_]).
I didn’t think of it at all but thankfully it was included in the Hetzner guide – we need to adjust the the boot loader! I would have been VERY angry to reboot the machine and have it not boot. I’ve had problems with Grub on Hetzner dedicated machines before before (it’s ultimately why I’m not running Arch Linux on the server right now). This time though, it looks like I’ll be able to avoid those belly aches – I needed to:
Create a new Grub device map (I’m using Grub2):
$ grub-mkdevicemap -n
Install Grub on the new (partially restored) device:
grub-install /dev/nvme1n1
Great, now all the mdraid data is transferred and Grub is installed.
ZFS has lots of documentation out there but I found the Joyent docs which offer a very high level view particularly helpful (note that this article is for OpenBSD so some tools are not present on linux like fmadm). This was a decent place to start and if you’re not too phased by of course the OpenBSD handbook section on ZFS is also a fantastic resource. We’re using ZFS on Linux so of course OpenZFS documentation there are more relevant to our needs.
Anyway, back to doing the restoration! Now that I have the drive in the right place, with mdadm partition data restored, all that’s left is that last partition (around 300GB) which should house ZFS data. If I had some offsite backups I could restore with a zfs recv or something of that sort, but we’re going to need to go for a full mirror resilver from the existing drive (this can be risky because it does put load on the now-single liven drive). After crossing some of my fingers I got started.
First here’s the current state of the system:
root@node-3 ~ # zpool list
no pools available
We know this is kind of a lie – the zpool is there but it’s not imported because it’s degraded as a disk was missing. That disk is now back, but obviously doesn’t contain any of the data that ZFS expects it to. zfs list will of course also show no datasets available.
And if we zfs import we’ll see the “missing” pool:
root@node-3 ~ # zpool import
   pool: tank
     id: 7705949272249162819
  state: DEGRADED
status: One or more devices contains corrupted data.
 action: The pool can be imported despite missing or damaged devices.  The
        fault tolerance of the pool may be compromised if imported.
   see: https://openzfs.github.io/openzfs-docs/msg/ZFS-8000-4J
 config:

        tank           DEGRADED
          mirror-0     DEGRADED
            nvme0n1p5  ONLINE
            nvme1n1p5  UNAVAIL  invalid label
The keen reader will notice that the drive has a new message next to the UNAVAIL status – invalid label! ZFS sees a new drive there but doesn’t see the data that it expects.
At this point I was a bit confused – I thought I might need to run zpool replace on the drive that was missing, but I needed to read the (wrong) docs a bit more. After some more confusion I figured out that to actually do a zpool replace I needed the pool to actually be present! The first step is forcing the import, even in it’s degraded state:
root@node-3 ~ # zpool import tank
root@node-3 ~ # zpool list
NAME   SIZE  ALLOC   FREE  CKPOINT  EXPANDSZ   FRAG    CAP  DEDUP    HEALTH  ALTROOT
tank   314G  92.1G   222G        -         -    12%    29%  1.00x  DEGRADED  -
root@node-3 ~ # zpool status
  pool: tank
 state: DEGRADED
status: One or more devices could not be used because the label is missing or
        invalid.  Sufficient replicas exist for the pool to continue
        functioning in a degraded state.
action: Replace the device using 'zpool replace'.
   see: https://openzfs.github.io/openzfs-docs/msg/ZFS-8000-4J
  scan: scrub repaired 0B in 00:00:00 with 0 errors on Sun Oct 10 00:24:01 2021
config:

        NAME                     STATE     READ WRITE CKSUM
        tank                     DEGRADED     0     0     0
          mirror-0               DEGRADED     0     0     0
            nvme0n1p5            ONLINE       0     0     0
            1845643194530042201  UNAVAIL      0     0     0  was /dev/nvme1n1p5

errors: No known data errors
OK, now we’ve got even more movement underneath the surface – the previous mirror vdev (the 5th partition of the second drive – /dev/nvme1n1p5) now has a randomized name, and there’s no vdev that represents the new nvme1n1p5.
Now the arguments of zpool replace make sense! ZFS has made a randomized name there that we can refer to, and we can give it the “new drive”:
root@node-3 ~ # zpool replace tank 1845643194530042201 nvme1n1p5
Now we can check zpool status:
root@node-3 ~ # zpool status
  pool: tank
 state: DEGRADED
status: One or more devices is currently being resilvered.  The pool will
        continue to function, possibly in a degraded state.
action: Wait for the resilver to complete.
  scan: resilver in progress since Wed Dec  8 03:22:07 2021
        92.1G scanned at 1.21G/s, 29.2G issued at 393M/s, 92.1G total
        29.6G resilvered, 31.69% done, 00:02:43 to go
config:

        NAME                       STATE     READ WRITE CKSUM
        tank                       DEGRADED     0     0     0
          mirror-0                 DEGRADED     0     0     0
            nvme0n1p5              ONLINE       0     0     0
            replacing-1            DEGRADED     0     0     0
              1845643194530042201  UNAVAIL      0     0     0  was /dev/nvme1n1p5/old
              nvme1n1p5            ONLINE       0     0     0  (resilvering)

errors: No known data errors
Similar to mdadm, ZFS gets started with resilvering automatically – Resilvering was done quite quickly:
root@node-3 ~ # zpool status
  pool: tank
 state: ONLINE
status: Some supported and requested features are not enabled on the pool.
        The pool can still be used, but some features are unavailable.
action: Enable all features using 'zpool upgrade'. Once this is done,
        the pool may no longer be accessible by software that does not support
        the features. See zpool-features(7) for details.
  scan: resilvered 93.9G in 00:03:03 with 0 errors on Wed Dec  8 03:25:10 2021
config:

        NAME           STATE     READ WRITE CKSUM
        tank           ONLINE       0     0     0
          mirror-0     ONLINE       0     0     0
            nvme0n1p5  ONLINE       0     0     0
            nvme1n1p5  ONLINE       0     0     0

errors: No known data errors
Awesome, we’re back to a fuly functional ZFS setup!
Well I’m not sure what features are not enabled but I guess I better run zpool upgrade. Maybe this was an issue from back when I degraded to 0.8.3 by accident… The pool was fully formed, and 0.8.3 couldn’t access it, but AFAIK upgrades are fine to do in-place on ZFS so let’s get right in:
root@node-3 ~ # zpool upgrade tank
This system supports ZFS pool feature flags.

Enabled the following features on 'tank':
  redaction_bookmarks
  redacted_datasets
  bookmark_written
  log_spacemap
  livelist
  device_rebuild
  zstd_compress
  draid
Well that just looks like some nice new features coming in (ex. ZSTD compression, DRAID). Running zfs upgrade didn’t cause any issues and I could continue on my merry way.
While the drive going dead did cost me quite a bit of uptime (my Statping instance was red for quite a bit), the downtime was actually could have been mitigated by mounting the pool despite the single disk failure. While that’s a questionable prospect (given the possibility of a second drive failure), Hetzner did replace the drive in <30 minutes so even a completley responsibly performed restore would have yielded “only” 30 minutes of downtime. 30 minutes is a lot of downtime, but as long as it happens only once a month, you’re still at 99.9% uptime!
As mentioned earlier, there are at least a few solutions to becoming completely robust to this kind of failure:
mdraid and ZFS)
Hopefully this post has helped you out if you’ve got a setup similar to mine, thanks for reading!